I've decided to move this blog to Github Pages.
Mostly, this is so I can write posts in markdown, and have code snippets without a load of faffing about.
The new blog is at https://oatzy.github.io/
I've already copied the old posts from this blog over to there.
I'm not deleting this blog, but all new posts will be over there, starting with Quicksort in One Line of Python
Chris.
Sunday, January 05, 2020
Monday, December 30, 2019
Put the following in order
YouTube channel, College Humor, has a game show series called 'Um, Actually' - a game of nerdy corrections, and general nerd trivia.
One of the 'shiny questions' involves putting things is order, for example, putting space ships or fictional creatures in order by size.
The way the scoring works (as far as I can tell) is you get one point for each item you put in the right 'position'. So if you guess (1,3,2,4), then you would get 2 points for getting 1 and 4 in the correct position.
The problem was, in the creatures game, there was this one creature which looked like a single-celled organism, but was actually the size of a galaxy (or something), making it the largest.
So suppose you get everything else in the right order, but you fell for the trap and put this surprisingly massive organism as smallest e.g. (2,3,4,1)
In that case, everything is in the wrong position, so no points. But I would argue since all but one are in the right order you should only lose one point.
The FineBros channel does a similar game - e.g. put the top 10 most liked videos of 2019 in order. Under their scoring system, you get 2 points if an entry is in the right position, and 1 point if it's off by one. So (1,3,2,4) would be worth 6 points and (2,3,4,1) would be worth 3 points
This is slightly better, but you still have a case where you can lose significant points for getting just one or two entries out of place. For example, if you had (3,4,5,6,7,1,2), then you would get 0 points, even tho 5 of 7 are in the right order.
So, can we come up with a better scoring system?
Levenshtein Distance
The first things that comes to mind is Levenshtein or 'minimum edit' distance.
This measures the distance between two strings (words) based on the minimum number of edits to get from one to the other. In this context, an edit is a single character addition (cats -> chats), deletion (cats -> cat), or substitution (cats -> bats)
Now, this doesn't seem quite relevant to our problem; we're not adding, deleting, or substituting, we're swapping. For Levenshtein, a swap would be considered a deletion + an addition (or 2 substitutions) e.g. cats -> cas -> cast
We could calculate the Levenshtein distance and just divide it by 2 - effectively treat delete+add (2 edits) as equivalent to a swap (1 edit). Or else, we can just take the general principle of finding the minimum number of swaps required to get from the guess solution to the correct order.
As for the actual score, we can take the number of entries in the list (N) minus the minimum number of swaps.
So for our original examples, (1,3,2,4) is worth 3, and (2,3,4,1) is also worth 3.
In the latter case, 1 wasn't 'swapped' with an actual element, but you could think of it as a swap with an implied 'null' element - (..,null,1,2,3,4,null,..) -> (..,null,null,2,3,4,1,null,...)
Dynamic Programming
Dynamic programming is an approach to solving a certain class of problem which would take a ridiculous amount of time to solve by brute force. With dynamic programming, these problems can be solved in a more reasonable amount of time by breaking them down and solving recursively.
One of the classic problem in dynamic programming is - find the longest increasing sub-sequence in a list of numbers?
For example, in (2,3,1,7,4,9,5,8) the longest increasing sub-sequence would be (2,3,4,5,8). So in this case, we might say the score is 5/8
Going back to our other examples, (1,3,2,4) would have sub-sequence (1,2,4) or (1,3,4), worth 3 in either case. And (2,3,4,1) would be (2,3,4) which is also worth 3
Weighted Error
This is all well and good, but doesn't it feel like (2,3,4,1) is 'more wrong' than (1,3,2,4). Each has one element out of order, but in the former that one element if further from where it's 'supposed' to be.
One correction might be to calculate the error as sum[abs(x-x')] where x is the position of an element, and x' is where it's supposed to be. So (1,3,2,4) would be (abs(1-1) + abs(3-2) + abs(2-3) + abs(4-4)) = 2
However, this is flawed. For the (2,3,4,1) example, the error comes out at 6. Once again, we're being penalised for all the elements that are in the right order but off-by-one
So a slight modification would be to only calculate the error for those elements which are out of place - that is, find the longest sub-sequence, and then calculate the error for all elements which don't belong to that sub-sequence.
For (1,3,2,4) the error would be 1 and for (2,3,4,1) it would be 3
But how do we get from the error to the actual score?
We can start by calculating the maximum error, then subtracting the calculated error from it. So what's the maximum error?
The most wrong you can be would be to get everything in the wrong order - i.e. all elements reversed. So if we have N elements, the error would be
abs(1 - N) + abs(2 - N-1) + ... + abs(N -1) = (N - 1) + (N - 3) + ... + (N - 1) = 4 * (N - 2)
Actually, there's a subtle flaw in this reasoning - even if all the elements are reversed, there is technically a longest sub-sequence of 1, so one of the entries shouldn't count towards the maximum error. The element we chose as the 1 correct one will affect the maximum error. If we chose the first element in the sequence, the max error is reduced by N-1, whereas if we chose one from the middle the max error is reduced by 1 or 0 (depending if there is an odd or even number of elements)
For simplicity, we'll just assume the middle entry and say max error adjustment is 0
So going back once more to our original examples, (1,3,2,4) has a score of 8 - 1 = 7, and (2,3,4,1) has a score of 8 - 3 = 5, making the latter 'more wrong' as desired.
Conclusion
I'm not sure if there was a point to all this. I don't think this is useful outside of scoring this particular kind of game.
It might be interesting to run an neural net or genetic algorithm or similar using this as the score function. I'd be interested to see how a neural net performed at sorting, in terms of performance and correctness.
But anyway,
Chris.
Sunday, April 02, 2017
Testing Python Unicode Handling the Lazy Way
Background
At work, we've been working on a Python API for IBM's Spectrum Scale (GPFS) filesystem.
The API is well tested, with good coverage. But one thing that's caught us out a couple of times is unicode.
For those not familiar, Python 2.7 has both byte strings and unicode strings. In most cases, the two are interchangeable. But there are some quirks, which can lead to bugs if not handled correctly.
Now it's usually safe to assume that users will work with byte strings - mostly because when you create a string, that is the default format. And internally, we always use byte strings.
But this being an API, it gets used by other people. And what I've come to learn is users do all sorts of weird things. The amount of bugs we've had from frankly bizarre filenames... (why would anyone put a newline character it a file name?!)
And users aside, unicode can also come from interfacing with other code - for example, the json.loads method.
All of which is to say, realistically, it's best not to ignore unicode.
Unittesting
Listen, I understand the value and importance of unittesting. I just find it so dull compared to writing 'proper' code. And frustrating! In my experience, most of the errors and fails raised by unittests come from the tests themselves, rather than the code they're supported to be testing. (Maybe that's on me).
So yeah. The thought of having to write a whole bunch of new unittests - most of which were going to be more or less exact copies of the tests that already existed - didn't appeal to me.
Instead, I wondered if maybe there was a lazier way of doing it.
The easiest way to do that was to take advantage of the tests that we'd already written. All we needed was a way to run those tests with some mechanism for convert any strings passed to API function calls to unicode.
Set Trace
One thing I particularly like about Python is the ability to monkey patch things - playing with existing code on the fly, without having to change the actual source code.
That's why the sys.settrace function is one of my favourites.
I came across set trace when I was looking at ways to do logging in the API. We wanted to be able to log function calls, functions returns, etc. The problem was, we didn't really want to add individual logging statements to each and every function. Aside from the effort, it'd really clutter the code.
After considering a couple other options (decorators, metaclasses), I came across settrace.
settrace isn't well explained in the official docs. You can find a better explanation here.
settrace allows you to set a trace function - a function which will be called for every line of code run, for every function call and return, for every exception - perfect!
A trace function receives 3 arguments - event, frame, and args.
event is a string indicating what the code is doing (line, call, return).
args is some arguments, which vary depending on the event - for example, if event is 'return', then args will hold the function return value.
And frame is a frame object. This is where we get most of our information for reporting.
The frame object holds some interesting stuff - the f_locals attribute holds the frame locals, and in the case of a call event, these locals are any variables that have been passed into the function.
There's also f_code - the code object for the function being called. And from that we can get things like f_code.co_name - the name of the function being called/returned from.
So as a simple example we might have
I ended up using settrace to write an 'strace' style script, which can be used to trace API function calls for a given script or piece of code. Which is pretty cool.
The Solution
So how does this apply to the unicode problem?
As mentioned above, we can get the parameters passed to the function from frame.f_locals. And because f_locals is a dict, it's mutable. That means that we can change it's values, and those changes will persist when the function being traced continues executing.
This is how this solution works - we convert any strings in f_locals to unicode. The code being 'traced' then behaves as if its functions had been passed unicode to begin with.
While we're at it, we have to make sure we also convert any strings in lists, tuples, dicts - in particular because *args and **kwargs are ultimately just a tuple and a dict.
Here's the complete solution
I decided mimic the unicode/__main__.py script, so that it works as a drop-in replacement for the Python unittest module - e.g.
$ python -m unicodetest discover -v tests/
This sets the trace to the unicoder function, then calls the usual unittest method to run whatever tests we have pre-written.
Dummy Test
Comments and Caveats
In unicodify I've used
if type(value) is dict
PEP8 recommends instead using
if isinstance(value, dict)
But this caused issues for us. In the API, we use OrderedDict as one of the base classes for collection objects. But their init functions doesn't have the same function signature as a dict (ordered or otherwise).
So using isinstance causes things to break. But that's fine - in the case of our collection objects, the members don't need unicodifying anyway. This will, however, miss actual OrderedDicts, so you may wish to change the code accordingly.
When I first tried the code, I kept getting the following error message
Exception TypeError: "'NoneType' object is not callable" in <function _remove at 0x7f4a9aae36e0> ignored
It wasn't fatal - the code worked in spite of it - but it was a little off-putting. With a little Googling, I found someone with the same problem, and a corresponding solution.
Basically, the issue was with the trace function not being disabled properly on exit. That's what the atexit line is for.
If the code you're testing is fairly simple, then you can use the code above as is. If it's a bit more complex, you'll probably find that converting strings to unicode in ALL functions causes problems in code outside of your control - in builtin modules, 3rd party modules.
This was the case for our API - the conversion seemed to upset regex (or something).
In this case, we need to make a slight tweak to make it only affect calls to functions from a particular module (the one we're trying to test).
In this case, we use the inspect.getmodule method with the frame's f_code member. That lets us identify what module the function being called came from, and apply unicoding conversion (or not) accordingly.
Now, I'm not a fan of hard-coding a module name into the script. Ideally, I'd probably add a command line flag to specify the module of interest. But parsing that would make the code more complicated, and would break the 'drop-in replacement' nature of the script. So this is left as an exercise for the reader.
Conclusion
So, rather than writing a whole bunch of new tests, I got away with writing only ~50 lines of code. And I didn't even have to change any of the existing code.
Hurray for laziness.
Oatzy.
[inb4 use Python 3]
At work, we've been working on a Python API for IBM's Spectrum Scale (GPFS) filesystem.
The API is well tested, with good coverage. But one thing that's caught us out a couple of times is unicode.
For those not familiar, Python 2.7 has both byte strings and unicode strings. In most cases, the two are interchangeable. But there are some quirks, which can lead to bugs if not handled correctly.
Now it's usually safe to assume that users will work with byte strings - mostly because when you create a string, that is the default format. And internally, we always use byte strings.
But this being an API, it gets used by other people. And what I've come to learn is users do all sorts of weird things. The amount of bugs we've had from frankly bizarre filenames... (why would anyone put a newline character it a file name?!)
And users aside, unicode can also come from interfacing with other code - for example, the json.loads method.
All of which is to say, realistically, it's best not to ignore unicode.
Unittesting
Listen, I understand the value and importance of unittesting. I just find it so dull compared to writing 'proper' code. And frustrating! In my experience, most of the errors and fails raised by unittests come from the tests themselves, rather than the code they're supported to be testing. (Maybe that's on me).
So yeah. The thought of having to write a whole bunch of new unittests - most of which were going to be more or less exact copies of the tests that already existed - didn't appeal to me.
Instead, I wondered if maybe there was a lazier way of doing it.
The easiest way to do that was to take advantage of the tests that we'd already written. All we needed was a way to run those tests with some mechanism for convert any strings passed to API function calls to unicode.
Set Trace
One thing I particularly like about Python is the ability to monkey patch things - playing with existing code on the fly, without having to change the actual source code.
That's why the sys.settrace function is one of my favourites.
I came across set trace when I was looking at ways to do logging in the API. We wanted to be able to log function calls, functions returns, etc. The problem was, we didn't really want to add individual logging statements to each and every function. Aside from the effort, it'd really clutter the code.
After considering a couple other options (decorators, metaclasses), I came across settrace.
settrace isn't well explained in the official docs. You can find a better explanation here.
settrace allows you to set a trace function - a function which will be called for every line of code run, for every function call and return, for every exception - perfect!
A trace function receives 3 arguments - event, frame, and args.
event is a string indicating what the code is doing (line, call, return).
args is some arguments, which vary depending on the event - for example, if event is 'return', then args will hold the function return value.
And frame is a frame object. This is where we get most of our information for reporting.
The frame object holds some interesting stuff - the f_locals attribute holds the frame locals, and in the case of a call event, these locals are any variables that have been passed into the function.
There's also f_code - the code object for the function being called. And from that we can get things like f_code.co_name - the name of the function being called/returned from.
So as a simple example we might have
import sys

def trace(frame, event, args):
    if event == "call":
        print frame.f_code.co_name, "called with", frame.f_locals
    elif event == "return":
        print frame.f_code.co_name, "returned", args
    return trace

sys.settrace(trace)
I ended up using settrace to write an 'strace' style script, which can be used to trace API function calls for a given script or piece of code. Which is pretty cool.
The Solution
So how does this apply to the unicode problem?
As mentioned above, we can get the parameters passed to the function from frame.f_locals. And because f_locals is a dict, it's mutable. That means that we can change it's values, and those changes will persist when the function being traced continues executing.
This is how this solution works - we convert any strings in f_locals to unicode. The code being 'traced' then behaves as if its functions had been passed unicode to begin with.
While we're at it, we have to make sure we also convert any strings in lists, tuples, dicts - in particular because *args and **kwargs are ultimately just a tuple and a dict.
Here's the complete solution
"""Unittest wrapper, which converts strings to unicode.

Check that your code can handle unicode input
without having to write new unittests.

Usage is identical to unittest:

$ python -m unicodetest tests.unit.test_whatever
"""
import atexit
import sys

# mimic the behaviour of unittest/__main__.py
from unittest.main import main, TestProgram, USAGE_AS_MAIN
TestProgram.USAGE = USAGE_AS_MAIN


def unicodify(value):
    """Convert strings to unicode.

    If value is a collection, its members
    will be recursively unicodified.
    """
    if isinstance(value, str):
        return unicode(value)
    if type(value) is dict:
        return {k: unicodify(v) for k, v in value.iteritems()}
    if type(value) in (list, tuple, set):
        return type(value)(unicodify(v) for v in value)
    return value


def unicoder(frame, event, args):
    """For all function calls, convert any string args to unicode."""
    if event == "call":
        for k, v in frame.f_locals.iteritems():
            frame.f_locals[k] = unicodify(v)
    return unicoder


if __name__ == '__main__':
    # make sure unicoder is disabled at exit
    atexit.register(lambda: sys.settrace(None))

    # activate unicoder
    sys.settrace(unicoder)

    # run unittests
    # cli args are passed thru to unittest
    # so the usage is identical
    sys.argv[0] = "python -m unicodetest"
    main(module=None)
I decided mimic the unicode/__main__.py script, so that it works as a drop-in replacement for the Python unittest module - e.g.
$ python -m unicodetest discover -v tests/
This sets the trace to the unicoder function, then calls the usual unittest method to run whatever tests we have pre-written.
Dummy Test
$ cat test_dummy.py

from unittest import TestCase

def dummy(value):
    return value

class Test_Type(TestCase):

    def test_string_type(self):
        self.assertIsInstance(dummy('foo'), unicode)

$ python -m unittest test_dummy

test_string_type (testtype.Test_Type) ... FAIL

======================================================================
FAIL: test_string_type (testtype.Test_Type)
----------------------------------------------------------------------
Traceback (most recent call last):
  File "testtype.py", line 13, in test_string_type
    self.assertIsInstance(dummy('foo'), unicode)
AssertionError: 'foo' is not an instance of <type 'unicode'>

----------------------------------------------------------------------
Ran 1 test in 0.001s

FAILED (failures=1)

$ python -m unicodetest test_dummy

test_string_type (testtype.Test_Type) ... ok

----------------------------------------------------------------------
Ran 1 test in 0.002s

OK
Comments and Caveats
In unicodify I've used
if type(value) is dict
PEP8 recommends instead using
if isinstance(value, dict)
But this caused issues for us. In the API, we use OrderedDict as one of the base classes for collection objects. But their init functions doesn't have the same function signature as a dict (ordered or otherwise).
So using isinstance causes things to break. But that's fine - in the case of our collection objects, the members don't need unicodifying anyway. This will, however, miss actual OrderedDicts, so you may wish to change the code accordingly.
When I first tried the code, I kept getting the following error message
Exception TypeError: "'NoneType' object is not callable" in <function _remove at 0x7f4a9aae36e0> ignored
It wasn't fatal - the code worked in spite of it - but it was a little off-putting. With a little Googling, I found someone with the same problem, and a corresponding solution.
Basically, the issue was with the trace function not being disabled properly on exit. That's what the atexit line is for.
If the code you're testing is fairly simple, then you can use the code above as is. If it's a bit more complex, you'll probably find that converting strings to unicode in ALL functions causes problems in code outside of your control - in builtin modules, 3rd party modules.
This was the case for our API - the conversion seemed to upset regex (or something).
In this case, we need to make a slight tweak to make it only affect calls to functions from a particular module (the one we're trying to test).
In this case, we use the inspect.getmodule method with the frame's f_code member. That lets us identify what module the function being called came from, and apply unicoding conversion (or not) accordingly.
module = inspect.getmodule(frame.f_code)
if module and module.__name__.startswith('mymodule'):
    # etc.
Now, I'm not a fan of hard-coding a module name into the script. Ideally, I'd probably add a command line flag to specify the module of interest. But parsing that would make the code more complicated, and would break the 'drop-in replacement' nature of the script. So this is left as an exercise for the reader.
Conclusion
So, rather than writing a whole bunch of new tests, I got away with writing only ~50 lines of code. And I didn't even have to change any of the existing code.
Hurray for laziness.
Oatzy.
[inb4 use Python 3]
Sunday, July 31, 2016
Barber Queue
Time was when I needed a hair cut, I'd go at noon on a weekday, when the barber's is typically empty. One of the perks of being unemployed.
But these days I have to get my haircuts on Saturdays, before noon. Which is bad enough in itself - ideally I'd never see Saturday mornings at all. And to make matters worse, Saturday morning is also when the barbers is at its busiest.
Hence, I found myself sat in the waiter area of a barbershop for the best part of an hour. But this got me thinking about how queuing works at a barbers.
First In Who's Next?
At its core, the barber's queue is just a first-in first-out (FIFO) queue. But it has two interesting features:
1) The queue 'structure' is unordered
In general the queue 'structure' will be a waiting area with a bunch of seats. When someone new joins the queue, they're free to sit wherever. In fact, odds are, they'll pick a seat in a similar way to how men choose urinals - attempting to maximise personal space.
But the key point is, if someone were to just look at the queue, they wouldn't be able to tell who was next.
2) Each member of the queue knows whether or not they're next
Each member of the queue probably doesn't know who exactly is next, but they do know (with reasonable certainty) whether or not it's them.
The way this works is relatively simple - when you join the queue, you're aware of who was there when you arrived (and of anyone who arrives after you). So when all the people who were there ahead of you have gone, you know that you're next.
O(M G)
Okay, lets break out some Python (2.7)
Just for fun, let's say that the capacity of the queue is fixed - i.e. the waiting area has a fixed number of seats (though in practice, people are free to stand, as I was forced to).
Here, we're picking a 'seat' by iterate over the queue looking for the first empty slot (with a value of None). We could implement any seat picking strategy we fancy, this is just the easiest.
Once we find an empty seat, we create a new 'Member' object for the item, with position set to the current length of the queue, then increment the queue length. Also, if the queue has no empty slots, we raise an exception.
Of course, this isn't how things work in practice. The barber doesn't go to each person and say "are you next?", "how about you?". They simply say "who's next?", and the person who believes they are next steps forward. Though arguably, that's just equivalent to asking every member concurrently. But let's not complicate things.
So there we have it. Of course, this type of queue isn't really useful from a programming perspective.
All of insertion, deletion, and lookup are worst-case \(O(N)\), where N is the queue's capacity (not the number of people in the queue). Which is pretty much worse than all other types of queue.
Why do items keep disappearing from my queue?
Okay, let's move away from computer-sciencey queues. There are certain behaviours in real-world queues that don't apply or wouldn't make sense to programmatic queues.
For one, as I alluded to earlier, the capacity of the queue is not enforced - there's room for overflow, even if it means people have to stand.
But on the other hand, when a place does get that full, people are less likely to stick around.
In particular, we have two situations:
1) There's a non-zero probability that a person will not stick around if the queue is full or close to full. This probability will tend to be related to the length of the queue when that person arrives
\[p(not join) \sim f(capacity, length)\]
For example,
\[p(not join) = A\left(\frac{length}{capacity}\right) - C\]
where A and C are some constants relating to how likely the person is to stick around if the queue is 'full', and at what point they consider the place to be 'too full'.
2) There's a non-zero probability that a person already in the queue will leave before they're served. This probability will typically depend on how long the person has been waiting, and how many people are still ahead of them
\[p(leave) \sim g(wait, position)\]
It's interesting because as time passes, wait increases, but position decreases. So how the probability evolves depends on how those factors balance against one another.
In particular, the probability evolution will likely depend on how each particular person responds to the sunk-cost fallacy - i.e. are they the sort to think "well, I've waited this long, I might as well see it through to the end", or do they think "this is taking too long, I've got better things to do with my time"?
For the sake of arguing, lets go with an exponential function for the general form.
For a sunk-cost person we might have
\[p(leave) = B \cdot \exp\left(-d\cdot \frac{wait}{position}\right)\]
This is a function where p goes to zero as position goes to zero or wait goes to infinity (B and d are some arbitrary constants).

Whereas for a non-sunk-cost person we might have
\[p(leave) = B \cdot \exp\left(-\frac{d}{wait \cdot position}\right)\]
This is a function where p goes to zero as position goes to zero, but goes to one as wait goes to infinity.
This gives us an interesting graph

Because 'position' is discrete you get this nice step function, with intervals of the probability steadily rising, then suddenly dropping. We can also see that there's a point at which probability of leaving is maximum, around the time you're in the middle of the queue. Which seems plausible.
We also have situations where a person will leave and come back later. But since, when they come back, they have to join the back of the queue, they're mathematically indistinguishable from a someone arriving for the first time.
One other complicating situation is people in groups. For example, if there's a parent and child ahead of you in the queue, the child is getting their hair cut by one member of staff, the parent is waiting; another member of staff asks 'who's next?' - is it you or the parent?
Situations like these add uncertainty into a member's queue position, and by extension their knowledge of whether they're next.
In that situation, we might wait to see if anyone else steps up, and if not we can assume it's our turn.
So we have \(p(next)\), which is a Bayesian probability that updates over time to reflect whether anyone else has stepped up yet. The longer we wait with no-one stepping up, the closer our probability gets to one.
 Of course, if you wait too long, someone behind you might assume you're not in the queue after all and try to go ahead of you. But that's a topic for another blog.
Nothing's so simple that it can't be made complex
I've written about queuing before, in the context of a mathematical model of a cafe.
The long and short of it is this - people arrive at random (following a Poisson distribution) and join the queue with some probability (see above). Each iteration, some people are served, some join the queue, some get tired of waiting and leave, etc.
I'm going to iterate in 5 min time-step and say that a haircut takes 10-25 minutes (i.e. 2-5 steps). The exact duration is randomly generated for each customer.
I'm going to say that on average one person shows up every 10 minutes (0.5 per step). Here's an example of how that might look over 12 steps (one hour), using the Poisson distribution: [2, 0, 2, 0, 0, 0, 1, 0, 0, 1, 0, 0]
I set up the simulation so that you specify some number of steps for the barbers to be considered 'open'. After that, no more people are added to the queue, but the simulation keeps running until the queue is empty.
To begin with, I made it so that everyone who arrived stayed.
With 2 workers, capacity 10, and an arrival rate of 0.5, the queue length typically stayed below 3. The highest I saw it go was 7, which is still comfortably within capacity.
 Above is an example of how the queue size varied over time in a particular simulation.
Increasing the arrival rate to 0.7, the average maximum queue length goes up into the low teens. And when the rate goes up to 1, the maximum queue length goes all the way up into the 30s.
Homework question - how does maximum queue length vary as a function of number of workers and arrival rate?
As I mentioned, those simulations assumed that everyone stuck around. Once you turn on probabilistic leaving, things get a bit more interesting.
I tried both versions of the leaving probability. The result was largely the same, except that sunk-cost people tend to leave sooner - average wait before leaving 2.6 for sunk vs 7.4 for non-sunk. This is what we'd expect - people adhering to sunk cost will tend to leave before they get too invested.

In the above example, orange is a time step when someone left the queue, and red is when a newcomer decided not to join the queue. I tuned the probability constants so that people don't start leaving until we're close to or at capacity, as we'd expect in real life.
You and I have different ideas of what constitutes 'interesting'
Going back to the original description of the barber's queue, here's an example of a full queue (bracketed numbers are queue positions)
Notice how, even with the basic seat picking strategy (take the first available), the members aren't in a predictable ordered.
When we look at the waiting times, we can see some interesting things. For example
Here we have a person who had to wait 9 steps (45mins) to be served, followed by someone who only had to wait 3 steps (15mins). Which just goes to show, how long you wait in a queue is very much a matter of timing and luck.
It's also interesting that you can run the simulation multiple times with the exact same settings, and one time the queue will never go higher than 4, while in the the next it'll go as high as 13. This is complexity at work - various small random factors in the model interacting to produce wildly different outcomes.
So yeah. If you're interested, you can see the full code here. I may have gotten carried away with the object-orienting.
Oatzy.
[Post-Script
My boss recently pointed out that it'd been over a year since my last blog post. That was another perk of being unemployed - more time to come up with dumb blog posts. Anyway, here's a quick update on some stuff.
Pirate Game
The last blog post was about the making of an Android game - The Pirate Game.
The game is now finished-ish and has been released in 'beta' on the Play Store.
In the previous post, I mentioned that the game would eventually get a less utilitarian design. I ended up making that design myself (because I'm a control freak). I'm pretty pleased with how it turned out.
 Also, following a... less than positive review, I added some new game play modes.
I never did figure out multiplayer, though. If I ever get the time or inclination to go back to the game, that'll be on the todo list. But for the time being, I don't anticipate any updates to the game. Certainly not any time soon.
New Job
So yeah. I finally got a job. I'm now a Software Developer at a company called Pixit Media.
The company sells large scale 'storage solutions' to companies primarily in the VFX industry, as well as universities and other such people that do high performance computing.
What I personally work on is primarily a Python API for the IBM Spectrum Scale (GPFS) filesystem. You can see the API docs online. I wrote a decent amount of the documentation (and the code that's being documented).
In particular, the 'Getting Started With List Processing' guide. Admittedly the topic is a bit niche - I doubt many readers of this blog even know of GPFS, let along have a cluster with it installed. But you might still find it interesting; you can learn some stuff about MapReduce - a technique for taking advantage of parallelism when processing large data-sets.
There's also the 'example scripts' repository - scripts written to use the API, some of while I wrote. But, again, they're a bit niche.
]
But these days I have to get my haircuts on Saturdays, before noon. Which is bad enough in itself - ideally I'd never see Saturday mornings at all. And to make matters worse, Saturday morning is also when the barbers is at its busiest.
Hence, I found myself sat in the waiter area of a barbershop for the best part of an hour. But this got me thinking about how queuing works at a barbers.
First In Who's Next?
At its core, the barber's queue is just a first-in first-out (FIFO) queue. But it has two interesting features:
1) The queue 'structure' is unordered
In general the queue 'structure' will be a waiting area with a bunch of seats. When someone new joins the queue, they're free to sit wherever. In fact, odds are, they'll pick a seat in a similar way to how men choose urinals - attempting to maximise personal space.
But the key point is, if someone were to just look at the queue, they wouldn't be able to tell who was next.
2) Each member of the queue knows whether or not they're next
Each member of the queue probably doesn't know who exactly is next, but they do know (with reasonable certainty) whether or not it's them.
The way this works is relatively simple - when you join the queue, you're aware of who was there when you arrived (and of anyone who arrives after you). So when all the people who were there ahead of you have gone, you know that you're next.
O(M G)
Okay, lets break out some Python (2.7)
Just for fun, let's say that the capacity of the queue is fixed - i.e. the waiting area has a fixed number of seats (though in practice, people are free to stand, as I was forced to).
class BarberQueue(object):

    def __init__(self, capacity):
        self._capacity = capacity
        self._queue = [None]*capacity
        self._length = 0

    def __len__(self):
        return self._length

    def __str__(self):
        return ', '.join(str(i) if i is not None else '_'
                         for i in self._queue)

    def push(self, obj):
        pass

    def pop(self):
        pass
So each member of the queue has some awareness of who is ahead of them. But they don't need to know specifically who's who, they just need to keep track of how many are remaining. And in fact, that remaining count is exactly equivalent to the member's position in the queue.
class Member(object):

    def __init__(self, obj, position=0):
        self.value = obj
        self._position = position

    def __str__(self):
        return "%s (%s)" % (self.value, self._position)

    def is_next(self):
        return self._position == 0

    def move_up(self):
        self._position -= 1
So, going back to the push and pop methods
def push(self, obj):

    if self._length == self._capacity:
        raise Exception("Queue is full! Please come back later.")

    for i, m in enumerate(self._queue):
        if m is None:
            self._queue[i] = Member(obj, self._length)
            self._length += 1
            return
Here, we're picking a 'seat' by iterate over the queue looking for the first empty slot (with a value of None). We could implement any seat picking strategy we fancy, this is just the easiest.
Once we find an empty seat, we create a new 'Member' object for the item, with position set to the current length of the queue, then increment the queue length. Also, if the queue has no empty slots, we raise an exception.
def pop(self):
    if self._length == 0:
        raise Exception("The queue is empty")
    for i, m in enumerate(self._queue):
        if m is not None:
            if m.is_next():
                value = m.value
                self._queue[i] = None
                self._length -= 1
            else:
                m.move_up()
    return value
Here we iterate over the queue looking for the member who is 'next' (has position 0). While we're looking for the next person, we also de-increment the positions of the other members.Of course, this isn't how things work in practice. The barber doesn't go to each person and say "are you next?", "how about you?". They simply say "who's next?", and the person who believes they are next steps forward. Though arguably, that's just equivalent to asking every member concurrently. But let's not complicate things.
>>> b = BarberQueue(3)
>>> for i in xrange(3):
 b.push(i)

>>> print b
0 (0), 1 (1), 2 (2)
>>> b.push(4)

Traceback (most recent call last):
  File "<pyshell>", line 1, in <module>
    b.push(4)
  File "<pyshell>", line 36, in push
    raise Exception("Queue is full! Please come back later")
Exception: Queue is full! Please come back later
>>> b.pop()
0
>>> print b
_, 1 (0), 2 (1)
>>> b.push(4)
>>> print b
4 (2), 1 (0), 2 (1)
>>> for _ in xrange(4):
 b.pop()

1
2
4

Traceback (most recent call last):
  File "<pyshell>", line 2, in <module>
    b.pop()
  File "<pyshell>", line 46, in pop
    raise Exception("Empty queue!")
Exception: Empty queue!
>>> print b
_, _, _
So there we have it. Of course, this type of queue isn't really useful from a programming perspective.
All of insertion, deletion, and lookup are worst-case \(O(N)\), where N is the queue's capacity (not the number of people in the queue). Which is pretty much worse than all other types of queue.
Why do items keep disappearing from my queue?
Okay, let's move away from computer-sciencey queues. There are certain behaviours in real-world queues that don't apply or wouldn't make sense to programmatic queues.
For one, as I alluded to earlier, the capacity of the queue is not enforced - there's room for overflow, even if it means people have to stand.
But on the other hand, when a place does get that full, people are less likely to stick around.
In particular, we have two situations:
1) There's a non-zero probability that a person will not stick around if the queue is full or close to full. This probability will tend to be related to the length of the queue when that person arrives
\[p(not join) \sim f(capacity, length)\]
For example,
\[p(not join) = A\left(\frac{length}{capacity}\right) - C\]
where A and C are some constants relating to how likely the person is to stick around if the queue is 'full', and at what point they consider the place to be 'too full'.
2) There's a non-zero probability that a person already in the queue will leave before they're served. This probability will typically depend on how long the person has been waiting, and how many people are still ahead of them
\[p(leave) \sim g(wait, position)\]
It's interesting because as time passes, wait increases, but position decreases. So how the probability evolves depends on how those factors balance against one another.
In particular, the probability evolution will likely depend on how each particular person responds to the sunk-cost fallacy - i.e. are they the sort to think "well, I've waited this long, I might as well see it through to the end", or do they think "this is taking too long, I've got better things to do with my time"?
For the sake of arguing, lets go with an exponential function for the general form.
For a sunk-cost person we might have
\[p(leave) = B \cdot \exp\left(-d\cdot \frac{wait}{position}\right)\]
This is a function where p goes to zero as position goes to zero or wait goes to infinity (B and d are some arbitrary constants).
Whereas for a non-sunk-cost person we might have
\[p(leave) = B \cdot \exp\left(-\frac{d}{wait \cdot position}\right)\]
This is a function where p goes to zero as position goes to zero, but goes to one as wait goes to infinity.
This gives us an interesting graph
Because 'position' is discrete you get this nice step function, with intervals of the probability steadily rising, then suddenly dropping. We can also see that there's a point at which probability of leaving is maximum, around the time you're in the middle of the queue. Which seems plausible.
We also have situations where a person will leave and come back later. But since, when they come back, they have to join the back of the queue, they're mathematically indistinguishable from a someone arriving for the first time.
One other complicating situation is people in groups. For example, if there's a parent and child ahead of you in the queue, the child is getting their hair cut by one member of staff, the parent is waiting; another member of staff asks 'who's next?' - is it you or the parent?
Situations like these add uncertainty into a member's queue position, and by extension their knowledge of whether they're next.
In that situation, we might wait to see if anyone else steps up, and if not we can assume it's our turn.
So we have \(p(next)\), which is a Bayesian probability that updates over time to reflect whether anyone else has stepped up yet. The longer we wait with no-one stepping up, the closer our probability gets to one.
Nothing's so simple that it can't be made complex
I've written about queuing before, in the context of a mathematical model of a cafe.
The long and short of it is this - people arrive at random (following a Poisson distribution) and join the queue with some probability (see above). Each iteration, some people are served, some join the queue, some get tired of waiting and leave, etc.
I'm going to iterate in 5 min time-step and say that a haircut takes 10-25 minutes (i.e. 2-5 steps). The exact duration is randomly generated for each customer.
I'm going to say that on average one person shows up every 10 minutes (0.5 per step). Here's an example of how that might look over 12 steps (one hour), using the Poisson distribution: [2, 0, 2, 0, 0, 0, 1, 0, 0, 1, 0, 0]
I set up the simulation so that you specify some number of steps for the barbers to be considered 'open'. After that, no more people are added to the queue, but the simulation keeps running until the queue is empty.
To begin with, I made it so that everyone who arrived stayed.
With 2 workers, capacity 10, and an arrival rate of 0.5, the queue length typically stayed below 3. The highest I saw it go was 7, which is still comfortably within capacity.

Increasing the arrival rate to 0.7, the average maximum queue length goes up into the low teens. And when the rate goes up to 1, the maximum queue length goes all the way up into the 30s.
Homework question - how does maximum queue length vary as a function of number of workers and arrival rate?
As I mentioned, those simulations assumed that everyone stuck around. Once you turn on probabilistic leaving, things get a bit more interesting.
I tried both versions of the leaving probability. The result was largely the same, except that sunk-cost people tend to leave sooner - average wait before leaving 2.6 for sunk vs 7.4 for non-sunk. This is what we'd expect - people adhering to sunk cost will tend to leave before they get too invested.

In the above example, orange is a time step when someone left the queue, and red is when a newcomer decided not to join the queue. I tuned the probability constants so that people don't start leaving until we're close to or at capacity, as we'd expect in real life.
You and I have different ideas of what constitutes 'interesting'
Going back to the original description of the barber's queue, here's an example of a full queue (bracketed numbers are queue positions)
542b5af6 (3), 33e323cf (5), 69e60241 (6), b3f12010 (0), fc89732e (7), 991f8709 (1), a0cb93cc (2), 17186c75 (4), 57269a3e (8), 8f1b61ca (9)
Notice how, even with the basic seat picking strategy (take the first available), the members aren't in a predictable ordered.
When we look at the waiting times, we can see some interesting things. For example
...
1c7081d1 waited 7.0
34 1
35 3
50be68cf waited 9.0
36 3
37 4
26ca11b7 waited 3.0
38 3
39 3
a571a7da waited 5.0
...
Here we have a person who had to wait 9 steps (45mins) to be served, followed by someone who only had to wait 3 steps (15mins). Which just goes to show, how long you wait in a queue is very much a matter of timing and luck.
It's also interesting that you can run the simulation multiple times with the exact same settings, and one time the queue will never go higher than 4, while in the the next it'll go as high as 13. This is complexity at work - various small random factors in the model interacting to produce wildly different outcomes.
So yeah. If you're interested, you can see the full code here. I may have gotten carried away with the object-orienting.
Oatzy.
[Post-Script
My boss recently pointed out that it'd been over a year since my last blog post. That was another perk of being unemployed - more time to come up with dumb blog posts. Anyway, here's a quick update on some stuff.
Pirate Game
The last blog post was about the making of an Android game - The Pirate Game.
The game is now finished-ish and has been released in 'beta' on the Play Store.
In the previous post, I mentioned that the game would eventually get a less utilitarian design. I ended up making that design myself (because I'm a control freak). I'm pretty pleased with how it turned out.

I never did figure out multiplayer, though. If I ever get the time or inclination to go back to the game, that'll be on the todo list. But for the time being, I don't anticipate any updates to the game. Certainly not any time soon.
New Job
So yeah. I finally got a job. I'm now a Software Developer at a company called Pixit Media.
The company sells large scale 'storage solutions' to companies primarily in the VFX industry, as well as universities and other such people that do high performance computing.
What I personally work on is primarily a Python API for the IBM Spectrum Scale (GPFS) filesystem. You can see the API docs online. I wrote a decent amount of the documentation (and the code that's being documented).
In particular, the 'Getting Started With List Processing' guide. Admittedly the topic is a bit niche - I doubt many readers of this blog even know of GPFS, let along have a cluster with it installed. But you might still find it interesting; you can learn some stuff about MapReduce - a technique for taking advantage of parallelism when processing large data-sets.
There's also the 'example scripts' repository - scripts written to use the API, some of while I wrote. But, again, they're a bit niche.
]
Sunday, June 28, 2015
The Pirate Game
A few months ago, my friend was telling me about this mobile game he wanted to make. He, and some of our other friends, are teachers, and this is a game they play with their students. The students apparently love it. And if there were an app version, they'd be willing to pay 59p for it. Or so they say.
Now, as he was explaining the game to me, I thought maybe he was building towards asking for my help. I felt almost betrayed that he didn't. Several years ago, I'd built a website for this friend that he'd had nothing but praise and gratitude for.
A month or so later, I got a text message - "How are you at programming?" For whatever reason, the guy they had originally 'hired' wasn't doing it anymore.
"I'm capable", I replied. I'd done a course in Java at university. Admittedly, that was 'Java for Mathematicians'. And it was also almost 8 years ago. But how hard could it be to pick up again? Just like coding a bicycle. Or something like that...
The Game
As the title of the blog suggests, its called 'The Pirate Game'. In the classroom it's played on paper.
Basically, you have a 7x7 grid filled with items - mostly coins, but also some items that let you do other things. There are attacks that let you, for example, rob or kill other players. There's a shield and a mirror that let you defend against attacks. There's a bank item that let's you save whatever points you have from being stolen, etc. There's a bomb that blows you up (sets your points to zero). And so on.
At the start of the game, the players arrange the items in their grids to their liking. The teacher (game) then calls out random squares, and the players get whatever is in that square on their own grid. In the classroom, if a player gets an attack item, they have to raise their hand and tell the teacher who they want to use it on. The winner is whoever has the most points when all the squares have been called.
Making Games 1: The Right Tools
In a previous blog, I asserted that making mobile games was difficult. In fact, it turns out to not be so bad with the right framework. In this case I used the popular LibGdx. What's particularly nice about it is that there are a lot of how-to guides, and there's plenty of help for when things go wrong.
As they say, programming is 1% inspiration, 99% Googling.
For anyone interested in making their own Android game, I found these guides particularly helpful,
LibGdx Zombie Bird Tutorial
LibGdx Game Development Essentials
Set up Google Services with LibGdx
HAL9000
I got a first working version of the game done in the space of about a month - this was just the basic game mechanics, a bare-bones interface, and a single computer opponent that I could play against to check that the mechanics were doing what they were supposed to.
In those first few tests of the game, I found that the computer player kept beating me - at one point, 7 to 1. This seemed strange - neither I nor the computer could choose who we attacked, or which defences we used. So really, there wasn't anything either of us could do to influence the outcome of the game. The winner should have been totally random.
So loosing 7 times out of 8 seemed significant to me. As far as I could tell, the mechanics were working correctly. The only theory I could come up with was that maybe there was some advantage in the order in which we took our turns.
To try and figure out what was going on, I created a simulation. Basically, I re-wrote a very stripped down version of the player and game mechanics in Python. I then had two computer players play against each other in 10,000 matches. The results from this were - Player 1: 5005, Player 2: 4995.
In other words, the winner was just random chance. And turn order didn't matter.
If nothing else, this was a lesson in not drawing conclusions from such a small data set - it's not really statistically significant if there are only 8 data points (that's a standard error of ~3). After playing more games, the wins did end up averaging out.
Making Games 2: Coordinating Players
Development progressed. I got the full game mechanics working, and added more computer players (Clu and Ultron). I was now able to choose who I wanted to attack and what defences I wanted to use.
But the ultimate goal for the game is to let users play against their (human) friends. This meant I had to do a massive re-write to generalise the interaction mechanics.
Okay, lets look at an example of an interaction. Say I want to swap points with another player. First, my device needs to pop-up a player select dialog. Once I pick a target, the game needs to inform that player that I'm trying to swap points with them. If that player has a shield, their device needs to pop-up a dialog asking if they want to use it. The game then needs to inform me of my target's response - and if the target doesn't defend them self, we need to tell each other what our respective points are so that we can complete the swap.
That's a lot of back and forth to handle. Here are the rough diagrams I drew when I was trying to get the mechanics straight in my head.
So the way the interaction works in the code is, the attacker sends their target a data object telling them who the attacker is, what attack they're trying to use, and what points they have (though the points aren't visible to the target). Once the target has chosen their defence, they complete their side of the attack processing - so in the swap example, if the target doesn't defend, they set their points to those of the attacker.
The target then sends the attacker's original data, along with the defence they chose (if any) and their (pre-attack) points to all the other players. If the recipient is the original attacker, they complete their side of the attack. Then, all players are shown a notification telling them what happened.
All this coordination is done by a turn handler class. And what's nice is the computer players can also interact with each other, and with the local human player, via the turn handler.
All I need to do now is set up the stuff that actually sends the data between network players.
Game Theory
Through testing (looking for bugs and the like), I've played this game A LOT. And I've gotten a pretty good feel for how it works. It's actually quite fascinating when you really get into it. (Or maybe that's just Stockholm Syndrome talking).
Information is important to the game. Without it, players would be forced to make their moves at random. And when that happens, winning becomes mostly random chance. This is why players are shown notifications when other players interact - it allows them to strategise.
The most basic strategies are things like - rob people who have lots of points, don't try to rob people who have just been killed (they don't have any points to take), defend yourself when you have a lot of points (if you can). Really, this is just being sensible.
Then there are more subtle strategies. For example, sometimes it's better to lose a lot of points to the bomb or to being killed (removing those points from the game) rather than letting another player take them. Because, you don't need a lot of points to win, you just need more than everyone else.
Given the inherent randomness of the game, a lot of how you play will come down to how risk-averse you are. For example, a particularly risky strategy might be to let an opponent rob you (saving your defences), in the hopes that you can steal back your points, and more, later on.
When you play against humans (rather than AI), a whole bunch of social factors can come into play too. From what I hear, in the classroom, students tend to disproportionately target any members of staff that are playing. Though I can't imagine why.
One other interesting feature of the game is that it sometimes forces players to make disadvantageous moves. There's the bomb item that will take away your points when it inevitably comes up. And if you're in first place, the swap item forces you to give your points, and the lead, to another player.
So yeah, the game's not as simple as it might seem on the face of it.
Artificial Intelligence
In the first fully featured version of the game, the computer players made their decisions completely randomly. And that was fine - the game is perfectly playable with random opponents, it's not too easy, and the randoms can and will beat you on occasion. Sometimes by an embarrassing margin.
But random players also do things that don't make sense. So I wanted to create some computer players that used basic strategies to play more intelligently.
For interactions, these intelligent computer players (AI) use literal hit lists and avoid lists. As mentioned above, when two players interact, that information is sent to all other players. For humans, this information is displayed as a notification. For the AI, the information is processed to build/modify the hit and avoid lists.
For example, if Player 1 steals a lot of points from Player 2, then Player 1 is added to the hit list and Player 2 is added to the avoid list. If another player then kills Player 1, Player 1 is removed from the hit list and added to the avoid list. And so on.
If the AI then gets an attack square, they'll first check their hit list for a target. If the hit list is empty, they'll chose a random opponent who isn't on the avoid list. And so on.
There are also various basic heuristics for choosing which defences to use (and when), and for choosing a square when they get 'Choose Next'.
As they are, the AI are quite formidable, and at times frustratingly so. In general, I think it's better to have a mix of random and intelligent computer players. The AI offer a challenge, while the chaotic influence of the random players keeps things interesting.
Measuring Difficulty
In the game's current form, you can play against 2-7 computer players, and these players can be either random or 'intelligent' (as above). That means 33 unique opponent set-ups. Which raises the question - how can we rate the difficulty of any given set-up.
Obviously it's harder to win when there are more opponents. Specifically, the probability of a random player winning in a game of N random players is 1/N. Think of it like this - if all the players behave in the same way, they are indistinguishable. And if they're indistinguishable, they must all have the same probability of winning (turn order doesn't matter).
The same logic applies to intelligent computer players (AI) - since they all follow the same set of rules, they must also be indistinguishable from each other. Therefore, the odds of an AI winning in a game of N AI players must also be 1/N .
But what happens when there's a mix? How much harder are AI to beat than randoms?
To answer that, we can run some more simulations. This time, instead of re-writing code in Python, I created a modified version of the turn handler (see above) within the game project itself. Essentially I just removed all code that related to human players, and added a few bits to track statistics.
I set up the 33 different player configurations, ran 10,000 matches for each, and worked out the probability of winning for an AI player - for simplicity, we're assuming that a human player (playing strategically) is roughly equivalent to an AI.
From those simulations I made this lovely surface plot (using matplotlib).
And what we find is AI are roughly twice as hard to beat as randoms - notice the surface is higher on the right hand side (when there are fewer AI).
In other words, your odds of winning in a match against two AI is roughly equal to your odds of winning in a match against four randoms. For simplicity, we're going to assume that the relationship is exactly two to one.
We can now calculate an approximation of the odds of winning as
\[ p(R, I) = \frac{2}{R + 2(I+1)} \]
And if we compare these probabilities to those from the simulations, we find that they are within standard error (order 0.01 for 10,000 trials).

To get a difficulty rating, we can just turn the probability on it's head, and normalise by the probability for the easiest set-up (2 random opponents). That is,
\[ D = \frac{p_0}{p} = \frac{R + 2(I+1)}{4} \]
This gives us a difficulty rating between 1 and 4, which lets us easily divide the difficulty into three levels - easy, medium, and hard. Though, if your odds of winning in the easiest possible game is only 50:50, can it really be considered 'easy'?
Another nice property of this difficulty rating system is that the difficulty ratios match the probability ratios - that is, your odds of winning a 2 are half your odds of winning a 1, and so on. Specifically, your odds of winning are roughly \( \frac{1}{2D} \)
Incidentally, if we assume our human player instead makes their moves completely at random, then their odds of winning are lower overall - \( p = \frac{1}{R+1+2I} \) - but the difficulty stratification works out the same.
Conclusion
Ordinarily, I'd include my code for this sort of thing. But in this case, doing so might undermine my (and my friends') income. And they very kindly told me that I'd get the majority of the profits. Whatever those may ultimately be.
So far we've made a whopping 7p (!) just from having adMob set up in the test builds.
But before we can make any (real) money, we have to actually finish the game. The single player version is mostly done, and should be released in the near future. The last big thing to do is the UI (which is someone else'sproblem job).
Then the hard part is going to be setting up multi-player with Google Play Services. In particular, because there aren't any good guides (that I can find) for setting up Google multi-player with LibGdx.
When it is done, I'll post links and such here for anyone that might be interested.
[edit] - If you want to try the current beta, you can get it here.
Also, given that making an Android game has turned out to be much easier than I expected, I may in fact make the previously discussed relativity game myself (once the Pirate Game is finished). In that case, I might also provide my code.
Oatzy.
[I'd love to make an AI that uses machine learning to counter human players' personal strategies.]
Now, as he was explaining the game to me, I thought maybe he was building towards asking for my help. I felt almost betrayed that he didn't. Several years ago, I'd built a website for this friend that he'd had nothing but praise and gratitude for.
A month or so later, I got a text message - "How are you at programming?" For whatever reason, the guy they had originally 'hired' wasn't doing it anymore.
"I'm capable", I replied. I'd done a course in Java at university. Admittedly, that was 'Java for Mathematicians'. And it was also almost 8 years ago. But how hard could it be to pick up again? Just like coding a bicycle. Or something like that...
The Game
As the title of the blog suggests, its called 'The Pirate Game'. In the classroom it's played on paper.
Basically, you have a 7x7 grid filled with items - mostly coins, but also some items that let you do other things. There are attacks that let you, for example, rob or kill other players. There's a shield and a mirror that let you defend against attacks. There's a bank item that let's you save whatever points you have from being stolen, etc. There's a bomb that blows you up (sets your points to zero). And so on.
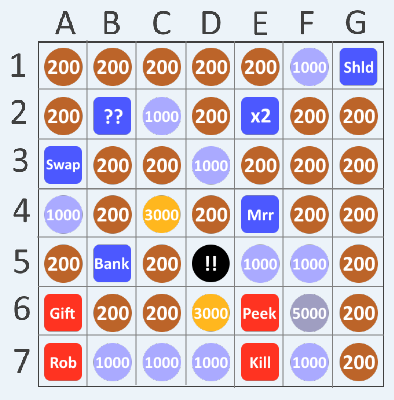 |
| This is the prototyping design. The final product will look less utilitarian. |
At the start of the game, the players arrange the items in their grids to their liking. The teacher (game) then calls out random squares, and the players get whatever is in that square on their own grid. In the classroom, if a player gets an attack item, they have to raise their hand and tell the teacher who they want to use it on. The winner is whoever has the most points when all the squares have been called.
Making Games 1: The Right Tools
In a previous blog, I asserted that making mobile games was difficult. In fact, it turns out to not be so bad with the right framework. In this case I used the popular LibGdx. What's particularly nice about it is that there are a lot of how-to guides, and there's plenty of help for when things go wrong.
As they say, programming is 1% inspiration, 99% Googling.
For anyone interested in making their own Android game, I found these guides particularly helpful,
LibGdx Zombie Bird Tutorial
LibGdx Game Development Essentials
Set up Google Services with LibGdx
HAL9000
I got a first working version of the game done in the space of about a month - this was just the basic game mechanics, a bare-bones interface, and a single computer opponent that I could play against to check that the mechanics were doing what they were supposed to.
In those first few tests of the game, I found that the computer player kept beating me - at one point, 7 to 1. This seemed strange - neither I nor the computer could choose who we attacked, or which defences we used. So really, there wasn't anything either of us could do to influence the outcome of the game. The winner should have been totally random.
So loosing 7 times out of 8 seemed significant to me. As far as I could tell, the mechanics were working correctly. The only theory I could come up with was that maybe there was some advantage in the order in which we took our turns.
To try and figure out what was going on, I created a simulation. Basically, I re-wrote a very stripped down version of the player and game mechanics in Python. I then had two computer players play against each other in 10,000 matches. The results from this were - Player 1: 5005, Player 2: 4995.
In other words, the winner was just random chance. And turn order didn't matter.
If nothing else, this was a lesson in not drawing conclusions from such a small data set - it's not really statistically significant if there are only 8 data points (that's a standard error of ~3). After playing more games, the wins did end up averaging out.
Making Games 2: Coordinating Players
Development progressed. I got the full game mechanics working, and added more computer players (Clu and Ultron). I was now able to choose who I wanted to attack and what defences I wanted to use.
But the ultimate goal for the game is to let users play against their (human) friends. This meant I had to do a massive re-write to generalise the interaction mechanics.
Okay, lets look at an example of an interaction. Say I want to swap points with another player. First, my device needs to pop-up a player select dialog. Once I pick a target, the game needs to inform that player that I'm trying to swap points with them. If that player has a shield, their device needs to pop-up a dialog asking if they want to use it. The game then needs to inform me of my target's response - and if the target doesn't defend them self, we need to tell each other what our respective points are so that we can complete the swap.
That's a lot of back and forth to handle. Here are the rough diagrams I drew when I was trying to get the mechanics straight in my head.
 |
| I doubt this helps clarifies things for anyone else. |
So the way the interaction works in the code is, the attacker sends their target a data object telling them who the attacker is, what attack they're trying to use, and what points they have (though the points aren't visible to the target). Once the target has chosen their defence, they complete their side of the attack processing - so in the swap example, if the target doesn't defend, they set their points to those of the attacker.
The target then sends the attacker's original data, along with the defence they chose (if any) and their (pre-attack) points to all the other players. If the recipient is the original attacker, they complete their side of the attack. Then, all players are shown a notification telling them what happened.
 |
| I figured I should give the computer players more piratical names. |
All this coordination is done by a turn handler class. And what's nice is the computer players can also interact with each other, and with the local human player, via the turn handler.
All I need to do now is set up the stuff that actually sends the data between network players.
Game Theory
Through testing (looking for bugs and the like), I've played this game A LOT. And I've gotten a pretty good feel for how it works. It's actually quite fascinating when you really get into it. (Or maybe that's just Stockholm Syndrome talking).
Information is important to the game. Without it, players would be forced to make their moves at random. And when that happens, winning becomes mostly random chance. This is why players are shown notifications when other players interact - it allows them to strategise.
The most basic strategies are things like - rob people who have lots of points, don't try to rob people who have just been killed (they don't have any points to take), defend yourself when you have a lot of points (if you can). Really, this is just being sensible.
Then there are more subtle strategies. For example, sometimes it's better to lose a lot of points to the bomb or to being killed (removing those points from the game) rather than letting another player take them. Because, you don't need a lot of points to win, you just need more than everyone else.
Given the inherent randomness of the game, a lot of how you play will come down to how risk-averse you are. For example, a particularly risky strategy might be to let an opponent rob you (saving your defences), in the hopes that you can steal back your points, and more, later on.
When you play against humans (rather than AI), a whole bunch of social factors can come into play too. From what I hear, in the classroom, students tend to disproportionately target any members of staff that are playing. Though I can't imagine why.
One other interesting feature of the game is that it sometimes forces players to make disadvantageous moves. There's the bomb item that will take away your points when it inevitably comes up. And if you're in first place, the swap item forces you to give your points, and the lead, to another player.
So yeah, the game's not as simple as it might seem on the face of it.
Artificial Intelligence
In the first fully featured version of the game, the computer players made their decisions completely randomly. And that was fine - the game is perfectly playable with random opponents, it's not too easy, and the randoms can and will beat you on occasion. Sometimes by an embarrassing margin.
But random players also do things that don't make sense. So I wanted to create some computer players that used basic strategies to play more intelligently.
For interactions, these intelligent computer players (AI) use literal hit lists and avoid lists. As mentioned above, when two players interact, that information is sent to all other players. For humans, this information is displayed as a notification. For the AI, the information is processed to build/modify the hit and avoid lists.
For example, if Player 1 steals a lot of points from Player 2, then Player 1 is added to the hit list and Player 2 is added to the avoid list. If another player then kills Player 1, Player 1 is removed from the hit list and added to the avoid list. And so on.
If the AI then gets an attack square, they'll first check their hit list for a target. If the hit list is empty, they'll chose a random opponent who isn't on the avoid list. And so on.
There are also various basic heuristics for choosing which defences to use (and when), and for choosing a square when they get 'Choose Next'.
As they are, the AI are quite formidable, and at times frustratingly so. In general, I think it's better to have a mix of random and intelligent computer players. The AI offer a challenge, while the chaotic influence of the random players keeps things interesting.
Measuring Difficulty
In the game's current form, you can play against 2-7 computer players, and these players can be either random or 'intelligent' (as above). That means 33 unique opponent set-ups. Which raises the question - how can we rate the difficulty of any given set-up.
Obviously it's harder to win when there are more opponents. Specifically, the probability of a random player winning in a game of N random players is 1/N. Think of it like this - if all the players behave in the same way, they are indistinguishable. And if they're indistinguishable, they must all have the same probability of winning (turn order doesn't matter).
The same logic applies to intelligent computer players (AI) - since they all follow the same set of rules, they must also be indistinguishable from each other. Therefore, the odds of an AI winning in a game of N AI players must also be 1/N .
But what happens when there's a mix? How much harder are AI to beat than randoms?
To answer that, we can run some more simulations. This time, instead of re-writing code in Python, I created a modified version of the turn handler (see above) within the game project itself. Essentially I just removed all code that related to human players, and added a few bits to track statistics.
I set up the 33 different player configurations, ran 10,000 matches for each, and worked out the probability of winning for an AI player - for simplicity, we're assuming that a human player (playing strategically) is roughly equivalent to an AI.
From those simulations I made this lovely surface plot (using matplotlib).
 |
| Configurations with more than 7 opponents have been set to zero. |
And what we find is AI are roughly twice as hard to beat as randoms - notice the surface is higher on the right hand side (when there are fewer AI).
In other words, your odds of winning in a match against two AI is roughly equal to your odds of winning in a match against four randoms. For simplicity, we're going to assume that the relationship is exactly two to one.
We can now calculate an approximation of the odds of winning as
\[ p(R, I) = \frac{2}{R + 2(I+1)} \]
And if we compare these probabilities to those from the simulations, we find that they are within standard error (order 0.01 for 10,000 trials).

To get a difficulty rating, we can just turn the probability on it's head, and normalise by the probability for the easiest set-up (2 random opponents). That is,
\[ D = \frac{p_0}{p} = \frac{R + 2(I+1)}{4} \]
This gives us a difficulty rating between 1 and 4, which lets us easily divide the difficulty into three levels - easy, medium, and hard. Though, if your odds of winning in the easiest possible game is only 50:50, can it really be considered 'easy'?
Another nice property of this difficulty rating system is that the difficulty ratios match the probability ratios - that is, your odds of winning a 2 are half your odds of winning a 1, and so on. Specifically, your odds of winning are roughly \( \frac{1}{2D} \)
Incidentally, if we assume our human player instead makes their moves completely at random, then their odds of winning are lower overall - \( p = \frac{1}{R+1+2I} \) - but the difficulty stratification works out the same.
Conclusion
Ordinarily, I'd include my code for this sort of thing. But in this case, doing so might undermine my (and my friends') income. And they very kindly told me that I'd get the majority of the profits. Whatever those may ultimately be.
So far we've made a whopping 7p (!) just from having adMob set up in the test builds.
But before we can make any (real) money, we have to actually finish the game. The single player version is mostly done, and should be released in the near future. The last big thing to do is the UI (which is someone else's
Then the hard part is going to be setting up multi-player with Google Play Services. In particular, because there aren't any good guides (that I can find) for setting up Google multi-player with LibGdx.
When it is done, I'll post links and such here for anyone that might be interested.
[edit] - If you want to try the current beta, you can get it here.
Also, given that making an Android game has turned out to be much easier than I expected, I may in fact make the previously discussed relativity game myself (once the Pirate Game is finished). In that case, I might also provide my code.
Oatzy.
[I'd love to make an AI that uses machine learning to counter human players' personal strategies.]
Thursday, March 12, 2015
Watch Face Designs for Android Wear (and How to Make Them)
In a previous pair of blogs, I designed some clock widgets for Android, using Zooper. At the end, I said that if I ever got a smart watch I'd remake them for Android Wear.
Well, here I am following up on that promise. I've also thrown in a few new designs for good measure.
Now, these are mostly concept watch faces - which is to say, they're more 'look at this cool thing you can do', than the sort of watch faces that you'd actually want to use.
As with the previous blogs, I've provided download links for my designs (which you should be able to customise), along with general instructions for how they're constructed, as well as some code snippets.
I know that a lot of the people who read this post will have come here from trying to google how to do something. As someone who does the same, I want this to be as helpful as possible.
Note, these faces were designed in particular for my watch - Moto 360. So if you have a different device (in particular, a square faced device) you might want/need to tweak some stuff.
Watchmaking Apps
There are two popular apps for making Android Wear watch faces - Facer and WatchMaker. I've tried (and paid for) both.
Facer is very bare-bones - the only objects available are text, shapes and images, and the only customisation options are object size, position, rotation, colour, and opacity. I think it's aimed more at people who want to import images to construct their faces.
WatchMaker has many more build-in objects, including dials, hands, weather, battery, countdowns, series, etc. There are also more customisation option to play with (and more still if you pay for Premium).
Facer uses the same syntax and tags as Zooper, so if you're familiar with that you might prefer Facer. But that also means it has the same shortcoming, in particular with respect to if-statements.
Watchmaker, on the other hand, uses the programming language 'Lua' for its coding. I'm not familiar with Lua as a whole, but I found it easy to pick up here, and easier to work with than the Zooper-style syntax.
Of the two apps, I personally prefer WatchMaker - I like all the extra built-in objects and customisations, and I find the Lua syntax, and the way WM handles layout (see below) easier to work with.
This means, then, that most (but not all) of the download links and code snippets in this blog are going to be for WatchMaker. You should be able to recreate a lot of the designs in Facer though.
Design Layout
Facer and WatchMaker use different coordinate origins - Facer positions objects relative to the top-left corner of the screen, where WatchMaker positions objects relative to the centre of the screen.
Now, for watch design, we'll often need to convert the positions of objects from polar coordinates - distance from the centre of the screen (r), and rotation about the centre (\(\theta\)) - to Cartesian coordinates (x, y).
Traditionally, the conversion is
\[ x = r \cos(\theta) \\
y = r \sin(\theta) \]
But this positions objects relative to the positive x-axis, or 3 o'clock (blue). Really, we want to position objects relative to the negative y-axis, or 12 o'clock (yellow).
To correct this, we have to subtract 90 degrees from the angle, \(\theta\). Or, alternatively, we can use some trigonometric identities to rewrite the conversion as
\[ x = r \cos(\theta-90) \equiv \ r \sin(\theta) \\
y = r \sin(\theta-90) \equiv \ -r\cos(\theta) \]
In Facer, we also have to add an offset of about \(x_0 ,\ y_0 = 160px\) to x and y, so that objects are positioned relative to the centre of the screen (rather than the top left corner).
Note that in both apps, the functions 'sin' and 'cos' take variables in radians, whereas the angles given by tags are in degrees. This means we have to include 'rad()' (Facer) or 'math.rad()' (WatchMaker) whenever we use trig functions.
Finally, it's worth noting that (for the Moto 360, at least) Facer gives us a design area of about 320px, matching the watch's screen dimensions. WatchMaker, on the other hand, gives us around 520px. This means that faces designed in WatchMaker will be scaled down on the watch itself, and in some cases, this leads to pixelation.
Anyway, with all that in mind, lets look at some designs.
> A Bunch of Binary
Proportional Binary [WM]
I have to start, of course, with my pet design - already available in javascript, and for Zooper.
Each ring segment is a binary bit, sized in proportion to the value it represents - the 4 minutes bit is twice as big as the two minutes bit, etc. The outer ring is hours (24h), the inner is minutes.
In Zooper, this design was constructed using curved rectangles, which neither of the face making apps support. However, in WatchMaker Premium, we can get more or less the same effect by creating a circle with a 'Segment Between' shader, and hiding the centre of the segment with a circle that's the same colour as the face background.
Once we have that, the rest of the face construction is essentially the same as the one described in the previous blog. It's set up so that the segment opacity is 100% if the bit (segment) is 'on', and 15% if 'off'.
A quick reminder, the n-th bit is off if \( x \bmod 2^{n+1} \lt 2^n \), and on otherwise. So for the twos bit in the minutes ring we have
And so on for all the other segments.
Unfortunately, this is one of the designs that suffers significant pixelation on the actual watch screen. A slight improvement was to make the rings narrower such as below. Here I've also added a seconds ring.
In this case we could put some other information in the middle of the screen and use the binary as decoration.
Binary Rings [Facer]
We can actually do an approximation of the previous design in Facer. This is done with triangles, that are strategically covered with circles/rings. However, because of how this construction works, the layout is a little restricted in how broad and close together the rings can be.
In this case, it's easier to have all the bits/segments be the same size. We could possibly have proportionally sized bits like above, but it'd be a lot of fiddling. On the other hand, Facer doesn't seem to have the pixelation issue, so it could be worth the effort.
Again, the opacity of the bits is changed as described above and in the previous blog. For example
Aside - It's not obvious, but the brackets in the above are important. In general, if you find your code isn't behaving in Facer, try copy-pasting it into a text object to see what it's being interpreted as. Usually you can solve problems by adding/removing brackets, or by looking for any spaces that might have been auto-inserted after punctuation marks.
Binary Numbers [Facer]
This is the first face I made for Android Wear. The bits are all individual text objects, with their values set according to that method I keep banging on about. For example, the twos minute bit is a text object with value
The face shown above is 24hour format, where the leftmost hours digit is a dummy bit. An alternative might be to do 12hour format, with an am/pm bit.
Aside - I had this idea for a face where the background is an image of a circuit board with two rows of those little square LEDs, which could be 'illuminated' to represent the time in binary. But I'm not much of an artist, so I doubt I could create a decent background image.
Trinary [WM]
In trinary, or base 3, each bit (trit?) can have one of three values - 0, 1, 2. In Zooper, I handled this by using curved progress bars, but that doesn't really work in WatchMaker. In this case, I had to use pairs of segments for each bit.
As with Zooper, I had the first of each bit pair change colour when the second was 'on', to make reading easier. Sometimes, though, WatchMaker doesn't change the segment colours like it should (possible bug?). If you prefer, you can download a version without colour changing here.
I explained how to do trinary in the previous blog. A quick reminder - the n-th digit of a number in base b is given by \(\lfloor \frac{x}{b^n} \bmod b\rfloor\).
As an example, for the pair of segments in the 3s minute bit we have
Notice that when we use an if-statement with the colour, we have to wrap the colour value in apostrophes (inverted commas). We don't have to do this for a lone colour value.
Similar to the binary design at the top, we have the pixelation problem on the actual watch, and again we can sort of help this by making the rings narrower.
Clocks in other bases (as seen in the previous blog) can be constructed in a similar way.
> Planets and Parametrisations
Orbital [WM]
I'm a fan of 'cryptic' clock designs - clocks that let you tell the time, but don't make it obvious. In this design, the position on the planet relative to the sun is the hours hand, and the position of the moon relative to the planet is the minutes hand.
 We set the planet's position as described in the Layout section
\[ x = r_h \sin(\theta_h) \\
y = -r_h\cos(\theta_h) \]
For the moon, we work out it's position relative to the planet, then add that to the planet's position relative to the sun
\[ x = r_h \sin(\theta_h) + r_m \sin(\theta_m) \\
y = -r_h \cos(\theta_h) - r_m \cos(\theta_m) \]
The code for this is
Orbital Numbers [WM]

This is basically the same principle as the above, except we've replaced the sun with the hours, the planet with the minutes, and the moon with the seconds. The code is similar to above, except we replace {drh} with {drm} and replace {drm} with {drs}. We also need to make the orbital radii slightly bigger to avoid overlapping - 165 for the planet/minutes, and 55 for the moon/seconds.
Elliptical Orbit [WM]

Here the planet does an elliptical orbit once per minute. The orbit also precesses (rotates) over the course of an hour, so that the planet's aphelion (furthest point from the sun) points to the current minutes past the hour.
An elliptical orbit, with aphelion pointing to 12 o'clock is given by
\[ x = -r_x\sin(\theta) \\
y = y_0 + r_y\cos(\theta) \]
To make the orbit precess, we can use the 2D rotation matrix
\[\begin{pmatrix}
\cos\phi & -\sin\phi \\
\sin\phi & \cos\phi
\end{pmatrix}\]
which gives use the rotated coordinates
\[ x' = x\cos\phi - y\sin\phi\\
y' = x\sin\phi + y\cos\phi \]
where \(\phi\) is the angle of rotation - in this case the minutes past the hour. So for the code, the precessing orbit is given by
The downside to this design is that it's pretty hard to tell where the aphelion is (i.e. the minutes past the hour) without watching the orbit for several seconds. Also, in it's current state, there's no way of telling the hour. Admittedly, this isn't great, design-wise. Really I just wanted to show off the rotation matrix.
As a variation, we could have, for example, three elliptical orbits (one for each hand), to make a face modeled after the classic portrayal of an atom (nucleus in the centre, with electrons whizzing around).
Binary Orbit [Facer] [WM]

This design was inspired by another previous blog post. Here we have a planet doing a figure-8 orbit around a pair of stars.
To set the planet's position, the sideways figure-8 path can be parametrised as
\[ x = r_x\sin\left(t\right) \\
y = r_y\sin\left(2t\right)\]
or in code
Changing the signs in front of either or both of the sin-functions will change the direction of orbit.
I was tempted to also have the stars (co)rotate - using the rotation matrix above to rotate the planet's orbit - so that they could act like an hours/minutes hand. But that seemed too much like hard work.
Spiral [WM]
In this design, the ball starts at the centre, and spirals outwards towards midday, then spirals back to the centre towards midnight. The ball's angular position gives the minutes past the hour.
The spiral is parameterised as
\[ x = r(t) \sin(\theta) \\
y = - r(t) \cos(\theta) \]
where the radius r is now a function of time. In code, this is
where {dtp} is the fraction of the day that has passed. Notice that we can use a conditional as a variable. That's pretty handy.
Originally, I didn't bother with the numbers (another cryptic design), but figured I should make it a little more readable. The numbers change at midday/midnight. Coding this is just a matter of creating text objects with values like
And so on.
Heart [WM]

Yes, I know, it looks ridiculous. When I realised I could have objects trace out any shape that can be parameterised, my first thought was the heart curve.
 This has the equations
\[ \begin{align*}x &= 16\sin(t)^3 \\
y &= 13\cos(t) - 5\cos(2t) - 2\cos(3t) - \cos(4t)\end{align*} \]
and can be coded as
In the screenshot/gif, the heart graphic is just decoration. The ball doesn't trace out that exact shape, but it's close.
I added a (poorly drawn) arrow as an hour hand. The shaft is a rectangle rotated using {drh24}. The triangles that make up the arrow head and fletching are moved around using the usual sin and -cos, and have to be rotated with {drh24} to make sure they point in the right direction.
> Analogue-esque
Metric [WM]

Quick reminder - Metric, or 'decimalised' time redefines the day as being 10 metric hours long, with 100 metric minutes to the metric hour, and 100 metric seconds to the metric minute.
Aside - this means a metric minute is equal to 1 milliday, and a metric second is 10 microdays.
For the hours hand, we just set its rotation to '#DWFH#' (Facer) or '{drh24}' (WatchMaker) - even though the day is being defined as 10 hours long, the hours hand still only needs to do one revolution per day.
For the minutes hand, we have to do the full conversion, as described previously, then convert that to a rotation (in degrees). The code looks like this
Note that in Facer the whole expression has to be wrapped in brackets to be interpreted and evaluated as maths.
The seconds hand is a little trickier. If we do the conversion as before,
the hand will point to the right time, but because it will only update every standard (non-metric) second, it will only 'tick' about 87 times per revolution (instead on 100 times).
There is a crafty work around, though. First, we have to include milliseconds (WatchMaker) or 'smooth rotation for seconds' (Facer) in the conversion, so that the hand will update more frequently. We then use the 'floor' function to round down to the nearest whole number - this will make the hand only 'tick' once per metric second. The code looks like this
Alternatively, we could omit the 'floor' function, and have a smooth seconds hand.
Backwards [WM]

Here, I've tried to make the face design as close to the one on my bedroom wall as possible. Code-wise, this is just a matter of setting the hands' rotations to
Squares [WM]

This was just a random idea I had, and is another good example of a cryptic clock. Each square represents a hand, and they're scaled by \(\sqrt{2}\) so that they always stay within each other. The code is basically the same as for any other analogue design - set the square rotations to '{drh}-45' / '(#DWFKS#-45)', etc.
Probably I should have added indicators to show which corner of each square is the 'hand'. But I reckon you could figure out the time (or at least guess) without. I mean, the above is obviously showing 9:29:55.
Spotlight [WM]

This is not my design - I couldn't find the original source. You can actually download a version of this face from the PlayStore. This is more for anyone who's curious about how to (re)create it. Plus, this way you can customise it to your heart's content, as you'll see further down.
 The basic idea is to create a dial that is bigger than the watch face itself, and place the centre of the dial somewhere off-screen. We then move the dial in a clockwise circle around the outside of the face, as
The hour line is just a rectangle with rotation {drh}
Spotlight with Minutes [WM]

One of the problems with the previous design is that there are only five minor markers between each hour marker - so in this context they're equivalent to 12 minutes each. This makes telling the minutes past the hour tricky. To remedy this we can introduce a little minutes circle.
This is just a matter of creating a circle outline and a minutes object, and moving them around as
Alternatively, we could use a dial that has a more useful number of minor markers. But the minutes circle is more visually striking, I think.
Spotlight with Minutes and Date [WM]

Okay, last one of these. I figured 'centre', above the hour line was the best place to put the date. For this, we have to make sure the date stays on the right side of the line and stays the right way up.
The code to do this is
Where the first terms for x and y move the date around with the hour line (note the signs), and the second terms are the positioning functions (dx, dy) that shift the date to above the hour line. The conditional in the rotation makes sure the text stays the right way up.
There is a slight problem with this on the Moto 360 - as you might notice in the above, the date will dip below the 'flat tire' line between about 11:15 and 12:45. If you have a 360, you might want move the date further along the line (change '165' in the code to something smaller).
> Fun with Progress Rings
Circles 1 [WM]
This and the following two designs are all variations on the same theme - it was inspired by an advert, I think. Can't remember what it was an advert for, though.
The outer ring segment represents the hours, and fills in (clockwise) towards midday, then 'unfills' from midday to midnight. This is made with a 'Segment Between' shader (WatchMaker Premium only) with
The orange circles around the outside are hour markers, and also give the hour ring the appearance of rounded corners. In this design, the smaller white circles over the hour markers act as minute markers, which change colour with the passing minutes, as for example
for the 5 minute marker, and so on.
Circles 2 [WM]
This design has the minutes as a separate inner ring, with four marker that behave similar to above, and with a 'progress ring' which indicates the exact minutes past the hour. The progress ring is made with another Segment shader, and the rounded corners on leading edge is done with a small circle, moved around with sin and -cos.
Circles 3 [WM]
This design is a sort of combination of the previous two, with the minutes progress ring placed on top of the hours ring. The minutes ring is made white when it overlaps an hours ring, and orange otherwise.
To make this we start with Circles 1, and for the minutes ring create two Segment Between shaders, which overlap half of the hours ring, with
We then need to create a smaller copy of the hours segment from Circles 1, as well as a segment with
to cover up the centre of the minutes segments and recreate the inner half of the hours ring.
The minute markers work as in Circles 1, but this time the hour markers also change colour, as for example,
You might notice in the screenshots above that this design seems to have a thin grey shadow/outline around some of the ring. I don't know if this is a bug or a feature of the shaders, but ideally it shouldn't be there.
Apple Activity [WM]

I saw something that looked like this in an Apple Watch promo - I think it was supposed to be an activity tracker. Anyway, it's a watch face for Android, now (take that, Apple). Shaders for progress rings, circles over the edges for rounded corners, I'm sure you get the idea by now.
Buffering [WM]

I was playing with shaders and came up with this, that looks sort of like a loading/buffering ring. The ring fills and unfills once a second, and the point where the ring fills from/to indicates the current seconds past the minute.
The code for this is
The percentage in the image above is the percentage of the day that has passed
The format function is used to round the percentage to one decimal place (Lua uses C-style formatting). Alternatively, I guess you could have hour and minute rings doing similar to this seconds ring, but that might be a bit dizzying.
Bonus: How to Make a Battery Ring in Facer [Facer]

As we've seen, making a progress ring in WatchMaker Premium is easy with shaders. But, you can actually make something similar to a progress ring in Facer.
The easy way to do this is to use polygons (squares, triangles, hexagons) to cover up sections of a ring, with the polygons coloured the same as the face background. We can then alter the polygon opacities to hide/reveal sections of the ring.
This gives us a progress ring with discrete intervals. How granular it is will depend on how many polygons we're willing to set up. For a battery meter, we could cover up a ring with 100 little squares, but it'd be a pain in the arse to build.
There is also a way to do a continuous progress ring, without too much effort - though it's a bit of an elaborate workaround. First we cover up a ring with 6 triangle, then we can shift, rotate and change the opacities of those triangles to hide/reveal the ring.
 It works sort of like a folding fan. The first triangle moves into the position of triangle 2, then turns transparent. Triangle 2 then moves to 3 and turns transparent. And so on, until we get to triangle 6. Obviously, if we move triangle 6 around the circle like the others, it'll cover up section 1. So instead, we move it vertically upwards.
Admittedly, this makes the angle on the leading edge of the ring look a bit off in section 6. But we work with what we've got. There are various fiddly little work-arounds that we could use to correct this - e.g. we could cover the leading edge with a little circle or square. Those are left as an exercise for the reader.
The code works like this
And so on for the next 3 triangles (with the boundaries and initial positions suitably adjusted). Finally, for the last triangle, we have
Aside - constructing this made Facer run slooooooow.
So there you have it - it's not easy, but it is possible to make a progress ring in Facer. You could do the same trick in WatchMaker (free) if you didn't want to pay for Premium. But personally, I'd prefer to pay - shaders are easier, and more flexible.
> Other Assorted Nonsense
50 Shades of Grey [Facer] [WM]

This is the sort of dumb thing I think up when I can't get to sleep. To make this, we create a watchface with a white background, and add a black circle/square that fills the whole screen. We then set the circle's opacity to
This will cycle through 50 different shades of grey - from white to black - over the course of a minute.
Alternatively, we could have it cycle from white to black to white, so that we don't have the sudden jump from black to white at the end of a minute - [download]
For that, the code is
Aside - Facer doesn't seem to allow mathematical expressions in both the then-statement and the else-statement (?!), so we can't adapt the above. Which is annoying.
That Dress [WM]
 You know the one. This works similarly to the above design - only this time we use 'HSV' shaders (WatchMaker Premium). For the background, we have a circle that fills the screen with
And the text, and the bars at the top and bottom of the screen are
This will go from black-blue to white-gold over the course of a minute. We can get a similar effect by layering a blue circle on top of a white background, and black text on top of a gold copy of the text, then varying the opacity of the black and blue. That method should work in Facer.
Alternatively, we can have the face cycle black-blue to white-gold to black-blue - [download]
Racing Numbers [WM]

Racing, in the sense that the numbers are moving from the right side of the screen to the left, all at different speeds (I couldn't think of a better name). Alternatively, you can think of it as the numbers being positioned horizontally based on their current value. It's straightforward enough to construct, I'm sure you can figure it out.
Jitters [Facer]

I don't have a gif of this - so imagine the time in the above image frantically jittering around the centre of the screen. The background is brown because I was tempted to call it 'too much coffee'.
This design is pretty much a case of, I saw that Facer had a 'random' function and I wanted to contrive a use for it. To make this face, we just set the position of the time object to
The time will be moved with every frame refresh - in Facer's case, I think that's 60fps. As far as I can tell there's no way to slow it down. I imagine this would get annoying after a while.
Conclusion
If you have a smart watch, making the face a replica of a 'dumb' watch seems a bit like missing the point. Having said that, if I saw a replica of my old watch I'd probably download it.
But the point is, you can do some design things with a smart watch that you could never do with a dumb watch. These are just a few ideas of some cool things you can do with face making apps.
Feel free to download, use, modify, re-post, etc. any of the designs or code in this post. You don't need to ask permission. If you do re-post, a name-check or link back would be nice, but I won't hold you to it.
The folder with all the faces is available here.
If you have any problems, want more details, or just want help with something, feel free to ask in the comments and I'll see what I can do.
Oatzy.
[If I had any sense I'd be trying to make some money off these...]
Well, here I am following up on that promise. I've also thrown in a few new designs for good measure.
Now, these are mostly concept watch faces - which is to say, they're more 'look at this cool thing you can do', than the sort of watch faces that you'd actually want to use.
As with the previous blogs, I've provided download links for my designs (which you should be able to customise), along with general instructions for how they're constructed, as well as some code snippets.
I know that a lot of the people who read this post will have come here from trying to google how to do something. As someone who does the same, I want this to be as helpful as possible.
Note, these faces were designed in particular for my watch - Moto 360. So if you have a different device (in particular, a square faced device) you might want/need to tweak some stuff.
Watchmaking Apps
There are two popular apps for making Android Wear watch faces - Facer and WatchMaker. I've tried (and paid for) both.
Facer is very bare-bones - the only objects available are text, shapes and images, and the only customisation options are object size, position, rotation, colour, and opacity. I think it's aimed more at people who want to import images to construct their faces.
WatchMaker has many more build-in objects, including dials, hands, weather, battery, countdowns, series, etc. There are also more customisation option to play with (and more still if you pay for Premium).
Facer uses the same syntax and tags as Zooper, so if you're familiar with that you might prefer Facer. But that also means it has the same shortcoming, in particular with respect to if-statements.
Watchmaker, on the other hand, uses the programming language 'Lua' for its coding. I'm not familiar with Lua as a whole, but I found it easy to pick up here, and easier to work with than the Zooper-style syntax.
Of the two apps, I personally prefer WatchMaker - I like all the extra built-in objects and customisations, and I find the Lua syntax, and the way WM handles layout (see below) easier to work with.
This means, then, that most (but not all) of the download links and code snippets in this blog are going to be for WatchMaker. You should be able to recreate a lot of the designs in Facer though.
Design Layout
Facer and WatchMaker use different coordinate origins - Facer positions objects relative to the top-left corner of the screen, where WatchMaker positions objects relative to the centre of the screen.
 |
| Notice that the y-axis is upside down in both apps. |
Now, for watch design, we'll often need to convert the positions of objects from polar coordinates - distance from the centre of the screen (r), and rotation about the centre (\(\theta\)) - to Cartesian coordinates (x, y).
Traditionally, the conversion is
\[ x = r \cos(\theta) \\
y = r \sin(\theta) \]
But this positions objects relative to the positive x-axis, or 3 o'clock (blue). Really, we want to position objects relative to the negative y-axis, or 12 o'clock (yellow).
To correct this, we have to subtract 90 degrees from the angle, \(\theta\). Or, alternatively, we can use some trigonometric identities to rewrite the conversion as
\[ x = r \cos(\theta-90) \equiv \ r \sin(\theta) \\
y = r \sin(\theta-90) \equiv \ -r\cos(\theta) \]
In Facer, we also have to add an offset of about \(x_0 ,\ y_0 = 160px\) to x and y, so that objects are positioned relative to the centre of the screen (rather than the top left corner).
Note that in both apps, the functions 'sin' and 'cos' take variables in radians, whereas the angles given by tags are in degrees. This means we have to include 'rad()' (Facer) or 'math.rad()' (WatchMaker) whenever we use trig functions.
Finally, it's worth noting that (for the Moto 360, at least) Facer gives us a design area of about 320px, matching the watch's screen dimensions. WatchMaker, on the other hand, gives us around 520px. This means that faces designed in WatchMaker will be scaled down on the watch itself, and in some cases, this leads to pixelation.
Anyway, with all that in mind, lets look at some designs.
> A Bunch of Binary
Proportional Binary [WM]
 |
| 22:22 |
I have to start, of course, with my pet design - already available in javascript, and for Zooper.
Each ring segment is a binary bit, sized in proportion to the value it represents - the 4 minutes bit is twice as big as the two minutes bit, etc. The outer ring is hours (24h), the inner is minutes.
In Zooper, this design was constructed using curved rectangles, which neither of the face making apps support. However, in WatchMaker Premium, we can get more or less the same effect by creating a circle with a 'Segment Between' shader, and hiding the centre of the segment with a circle that's the same colour as the face background.
Once we have that, the rest of the face construction is essentially the same as the one described in the previous blog. It's set up so that the segment opacity is 100% if the bit (segment) is 'on', and 15% if 'off'.
A quick reminder, the n-th bit is off if \( x \bmod 2^{n+1} \lt 2^n \), and on otherwise. So for the twos bit in the minutes ring we have
% opacity in range: {dm}%4 < 2 and 15 or 100
And so on for all the other segments.
Unfortunately, this is one of the designs that suffers significant pixelation on the actual watch screen. A slight improvement was to make the rings narrower such as below. Here I've also added a seconds ring.
 |
| [download] |
In this case we could put some other information in the middle of the screen and use the binary as decoration.
Binary Rings [Facer]
 |
| 22:17 |
We can actually do an approximation of the previous design in Facer. This is done with triangles, that are strategically covered with circles/rings. However, because of how this construction works, the layout is a little restricted in how broad and close together the rings can be.
In this case, it's easier to have all the bits/segments be the same size. We could possibly have proportionally sized bits like above, but it'd be a lot of fiddling. On the other hand, Facer doesn't seem to have the pixelation issue, so it could be worth the effort.
Again, the opacity of the bits is changed as described above and in the previous blog. For example
Opacity: $(#Dm#%4)<2?15:100$
Aside - It's not obvious, but the brackets in the above are important. In general, if you find your code isn't behaving in Facer, try copy-pasting it into a text object to see what it's being interpreted as. Usually you can solve problems by adding/removing brackets, or by looking for any spaces that might have been auto-inserted after punctuation marks.
Binary Numbers [Facer]
 |
| 21:30 |
This is the first face I made for Android Wear. The bits are all individual text objects, with their values set according to that method I keep banging on about. For example, the twos minute bit is a text object with value
Text: $(#Dm#%4)<2?0:1$
The face shown above is 24hour format, where the leftmost hours digit is a dummy bit. An alternative might be to do 12hour format, with an am/pm bit.
Aside - I had this idea for a face where the background is an image of a circuit board with two rows of those little square LEDs, which could be 'illuminated' to represent the time in binary. But I'm not much of an artist, so I doubt I could create a decent background image.
Trinary [WM]
 |
| 21:35 |
In trinary, or base 3, each bit (trit?) can have one of three values - 0, 1, 2. In Zooper, I handled this by using curved progress bars, but that doesn't really work in WatchMaker. In this case, I had to use pairs of segments for each bit.
As with Zooper, I had the first of each bit pair change colour when the second was 'on', to make reading easier. Sometimes, though, WatchMaker doesn't change the segment colours like it should (possible bug?). If you prefer, you can download a version without colour changing here.
I explained how to do trinary in the previous blog. A quick reminder - the n-th digit of a number in base b is given by \(\lfloor \frac{x}{b^n} \bmod b\rfloor\).
As an example, for the pair of segments in the 3s minute bit we have
Segment 1:
% opacity in range: math.floor({dm}/3)%3 >= 1 and 100 or 15
Color: math.floor({dm}/3)%3 == 2 and '2cb7ff' or '1b74c0'

Segment 2:
% opacity in range: math.floor({dm}/3)%3 == 2 and 100 or 15
Color: 1b74c0
Notice that when we use an if-statement with the colour, we have to wrap the colour value in apostrophes (inverted commas). We don't have to do this for a lone colour value.
Similar to the binary design at the top, we have the pixelation problem on the actual watch, and again we can sort of help this by making the rings narrower.
 |
| [download] |
Clocks in other bases (as seen in the previous blog) can be constructed in a similar way.
> Planets and Parametrisations
Orbital [WM]
 |
| 10:05 |
I'm a fan of 'cryptic' clock designs - clocks that let you tell the time, but don't make it obvious. In this design, the position on the planet relative to the sun is the hours hand, and the position of the moon relative to the planet is the minutes hand.
\[ x = r_h \sin(\theta_h) \\
y = -r_h\cos(\theta_h) \]
For the moon, we work out it's position relative to the planet, then add that to the planet's position relative to the sun
\[ x = r_h \sin(\theta_h) + r_m \sin(\theta_m) \\
y = -r_h \cos(\theta_h) - r_m \cos(\theta_m) \]
The code for this is
Planet:
x: 150*math.sin(math.rad({drh}))
y: -150*math.cos(math.rad({drh}))

Moon:
x: 150*math.sin(math.rad({drh})) + 50*math.sin(math.rad({drm}))
y: -150*math.cos(math.rad({drh})) - 50*math.cos(math.rad({drm}))
Orbital Numbers [WM]
This is basically the same principle as the above, except we've replaced the sun with the hours, the planet with the minutes, and the moon with the seconds. The code is similar to above, except we replace {drh} with {drm} and replace {drm} with {drs}. We also need to make the orbital radii slightly bigger to avoid overlapping - 165 for the planet/minutes, and 55 for the moon/seconds.
Elliptical Orbit [WM]
Here the planet does an elliptical orbit once per minute. The orbit also precesses (rotates) over the course of an hour, so that the planet's aphelion (furthest point from the sun) points to the current minutes past the hour.
An elliptical orbit, with aphelion pointing to 12 o'clock is given by
\[ x = -r_x\sin(\theta) \\
y = y_0 + r_y\cos(\theta) \]
To make the orbit precess, we can use the 2D rotation matrix
\[\begin{pmatrix}
\cos\phi & -\sin\phi \\
\sin\phi & \cos\phi
\end{pmatrix}\]
which gives use the rotated coordinates
\[ x' = x\cos\phi - y\sin\phi\\
y' = x\sin\phi + y\cos\phi \]
where \(\phi\) is the angle of rotation - in this case the minutes past the hour. So for the code, the precessing orbit is given by
x: -75*math.sin(math.rad({drs}))*math.cos(math.rad({drm})) - (150*math.cos(math.rad({drs}))-80)*math.sin(math.rad({drm}))
y: -75*math.sin(math.rad({drs}))*math.sin(math.rad({drm})) + (150*math.cos(math.rad({drs}))-80)*math.cos(math.rad({drm}))
The downside to this design is that it's pretty hard to tell where the aphelion is (i.e. the minutes past the hour) without watching the orbit for several seconds. Also, in it's current state, there's no way of telling the hour. Admittedly, this isn't great, design-wise. Really I just wanted to show off the rotation matrix.
As a variation, we could have, for example, three elliptical orbits (one for each hand), to make a face modeled after the classic portrayal of an atom (nucleus in the centre, with electrons whizzing around).
Binary Orbit [Facer] [WM]
This design was inspired by another previous blog post. Here we have a planet doing a figure-8 orbit around a pair of stars.
To set the planet's position, the sideways figure-8 path can be parametrised as
\[ x = r_x\sin\left(t\right) \\
y = r_y\sin\left(2t\right)\]
or in code
WM:
x: 225*math.sin(math.rad(6*{ds}))
y: 100*math.sin(math.rad(12*{ds}))

Facer:
x: (155+140*sin(rad(6*#Ds#)))
y: (150-70*sin(rad(12*#Ds#)))
Changing the signs in front of either or both of the sin-functions will change the direction of orbit.
I was tempted to also have the stars (co)rotate - using the rotation matrix above to rotate the planet's orbit - so that they could act like an hours/minutes hand. But that seemed too much like hard work.
Spiral [WM]
 |
| 9:35pm |
In this design, the ball starts at the centre, and spirals outwards towards midday, then spirals back to the centre towards midnight. The ball's angular position gives the minutes past the hour.
The spiral is parameterised as
\[ x = r(t) \sin(\theta) \\
y = - r(t) \cos(\theta) \]
where the radius r is now a function of time. In code, this is
x: 17 + 420*({dtp}<0.5 and {dtp} or 1-{dtp}))*math.sin(math.rad({drm}))
y: -17 - 420*({dtp}<0.5 and {dtp} or 1-{dtp}))*math.cos(math.rad({drm}))
where {dtp} is the fraction of the day that has passed. Notice that we can use a conditional as a variable. That's pretty handy.
Originally, I didn't bother with the numbers (another cryptic design), but figured I should make it a little more readable. The numbers change at midday/midnight. Coding this is just a matter of creating text objects with values like
Text: {dh23}<12 and 11 or 1
And so on.
Heart [WM]
Yes, I know, it looks ridiculous. When I realised I could have objects trace out any shape that can be parameterised, my first thought was the heart curve.
\[ \begin{align*}x &= 16\sin(t)^3 \\
y &= 13\cos(t) - 5\cos(2t) - 2\cos(3t) - \cos(4t)\end{align*} \]
and can be coded as
x: 192*(math.sin(math.rad(6*{ds})))^3
y: -156*math.cos(math.rad(6*{ds}) + 60*math.cos(math.rad(12*{ds}) + 24*math.cos(math.rad(18*{ds}) + math.cos(math.rad(36*{ds})
In the screenshot/gif, the heart graphic is just decoration. The ball doesn't trace out that exact shape, but it's close.
I added a (poorly drawn) arrow as an hour hand. The shaft is a rectangle rotated using {drh24}. The triangles that make up the arrow head and fletching are moved around using the usual sin and -cos, and have to be rotated with {drh24} to make sure they point in the right direction.
> Analogue-esque
Metric [WM]
Quick reminder - Metric, or 'decimalised' time redefines the day as being 10 metric hours long, with 100 metric minutes to the metric hour, and 100 metric seconds to the metric minute.
Aside - this means a metric minute is equal to 1 milliday, and a metric second is 10 microdays.
For the hours hand, we just set its rotation to '#DWFH#' (Facer) or '{drh24}' (WatchMaker) - even though the day is being defined as 10 hours long, the hours hand still only needs to do one revolution per day.
For the minutes hand, we have to do the full conversion, as described previously, then convert that to a rotation (in degrees). The code looks like this
WM: 360*((0.00011574*(3600*{dh23}+60*{dm}+{ds}))%1)

Facer: (360*((0.00011574*(3600*#DH#+60*#Dm#+#Ds#))%1))
Note that in Facer the whole expression has to be wrapped in brackets to be interpreted and evaluated as maths.
The seconds hand is a little trickier. If we do the conversion as before,
WM: 360*((0.011574*(3600*{dh23}+60*{dm}+{ds}))%1)

Facer: (360*((0.011574*(3600*#DH#+60*#Dm#+#Ds#))%1))
the hand will point to the right time, but because it will only update every standard (non-metric) second, it will only 'tick' about 87 times per revolution (instead on 100 times).
There is a crafty work around, though. First, we have to include milliseconds (WatchMaker) or 'smooth rotation for seconds' (Facer) in the conversion, so that the hand will update more frequently. We then use the 'floor' function to round down to the nearest whole number - this will make the hand only 'tick' once per metric second. The code looks like this
WM: 3.6*math.floor((1.1574*(3600*{dh23}+60*{dm}+{ds}+{dss}/1000))%100)

Facer: (3.6*floor((1.1574*(3600*#DH#+60*#Dm#+#DWFSS#/6))%100))
Alternatively, we could omit the 'floor' function, and have a smooth seconds hand.
Backwards [WM]
Here, I've tried to make the face design as close to the one on my bedroom wall as possible. Code-wise, this is just a matter of setting the hands' rotations to
WM: 360-{drh}, 360-{drm}, 360-{drs}

Facer: (360-#DWFKS#), (360-#DWFMS#), (360-#DWFS#)
Squares [WM]
This was just a random idea I had, and is another good example of a cryptic clock. Each square represents a hand, and they're scaled by \(\sqrt{2}\) so that they always stay within each other. The code is basically the same as for any other analogue design - set the square rotations to '{drh}-45' / '(#DWFKS#-45)', etc.
Probably I should have added indicators to show which corner of each square is the 'hand'. But I reckon you could figure out the time (or at least guess) without. I mean, the above is obviously showing 9:29:55.
Spotlight [WM]
This is not my design - I couldn't find the original source. You can actually download a version of this face from the PlayStore. This is more for anyone who's curious about how to (re)create it. Plus, this way you can customise it to your heart's content, as you'll see further down.
x: -350*math.sin(math.rad({drh}))
y: 350*math.cos(math.rad({drh}))
The hour line is just a rectangle with rotation {drh}
Spotlight with Minutes [WM]
One of the problems with the previous design is that there are only five minor markers between each hour marker - so in this context they're equivalent to 12 minutes each. This makes telling the minutes past the hour tricky. To remedy this we can introduce a little minutes circle.
This is just a matter of creating a circle outline and a minutes object, and moving them around as
x: 135*math.sin(math.rad({drh}))
y: -135*math.cos(math.rad({drh}))
Alternatively, we could use a dial that has a more useful number of minor markers. But the minutes circle is more visually striking, I think.
Spotlight with Minutes and Date [WM]
Okay, last one of these. I figured 'centre', above the hour line was the best place to put the date. For this, we have to make sure the date stays on the right side of the line and stays the right way up.
 |
| Positions of the date relative to the hour line (left) and the corresponding positioning functions (right) |
The code to do this is
x: -165*math.sin(math.rad({drh})) + ({dh11}<6 and -20 or 20)*math.cos(math.rad({drh}))
y: 165*math.cos(math.rad({drh})) + ({dh11}<6 and -20 or 20)*math.sin(math.rad({drh}))
Rotation: {drh} + ({dh11}<6 and -90 or 90)
Where the first terms for x and y move the date around with the hour line (note the signs), and the second terms are the positioning functions (dx, dy) that shift the date to above the hour line. The conditional in the rotation makes sure the text stays the right way up.
There is a slight problem with this on the Moto 360 - as you might notice in the above, the date will dip below the 'flat tire' line between about 11:15 and 12:45. If you have a 360, you might want move the date further along the line (change '165' in the code to something smaller).
> Fun with Progress Rings
Circles 1 [WM]
 |
| 2:27am (left) and 9:28pm (right) |
The outer ring segment represents the hours, and fills in (clockwise) towards midday, then 'unfills' from midday to midnight. This is made with a 'Segment Between' shader (WatchMaker Premium only) with
Degree Start: {dh23} < 12 and 0 or {drh0}
Degree End: {dh23} < 12 and {drh0} or 360
The orange circles around the outside are hour markers, and also give the hour ring the appearance of rounded corners. In this design, the smaller white circles over the hour markers act as minute markers, which change colour with the passing minutes, as for example
Colour: {dm}>=5 and 'ffbd2a' or 'fbfbfb'
for the 5 minute marker, and so on.
Circles 2 [WM]
 |
| 9:34pm |
This design has the minutes as a separate inner ring, with four marker that behave similar to above, and with a 'progress ring' which indicates the exact minutes past the hour. The progress ring is made with another Segment shader, and the rounded corners on leading edge is done with a small circle, moved around with sin and -cos.
Circles 3 [WM]
 |
| 1:36am (left) and 8:51pm (right) |
To make this we start with Circles 1, and for the minutes ring create two Segment Between shaders, which overlap half of the hours ring, with
Segment 1:
Segment Start: 0
Segment End: {drm}<{drh0} and {drm} or {drh0}
Color: {dh23}<12 and 'fbfbfb' or 'ffbd2a'

Segment 2:
Segment Start: {drh0}
Segment End: {drm}>{drh0} and {drm} or {drh0}
Color: {dh23}<12 and 'ffbd2a' or 'fbfbfb'
We then need to create a smaller copy of the hours segment from Circles 1, as well as a segment with
Segment Start: {dh23} < 12 and {drh0} or 0
Segment End: {dh23} < 12 and 360 or {drh0}
Color: fbfbfb
to cover up the centre of the minutes segments and recreate the inner half of the hours ring.
The minute markers work as in Circles 1, but this time the hour markers also change colour, as for example,
Colour: ((({dh11}>1 and {dh23}<12) or ({dh11}<1 and {dh23}>=12)) and {dm}>=5) and 'fbfbfb' or 'ffbd2a'
You might notice in the screenshots above that this design seems to have a thin grey shadow/outline around some of the ring. I don't know if this is a bug or a feature of the shaders, but ideally it shouldn't be there.
Apple Activity [WM]
I saw something that looked like this in an Apple Watch promo - I think it was supposed to be an activity tracker. Anyway, it's a watch face for Android, now (take that, Apple). Shaders for progress rings, circles over the edges for rounded corners, I'm sure you get the idea by now.
Buffering [WM]
I was playing with shaders and came up with this, that looks sort of like a loading/buffering ring. The ring fills and unfills once a second, and the point where the ring fills from/to indicates the current seconds past the minute.
The code for this is
Segment Start: ({ds}%2==0) and {drs} or ({drs}+0.36*{dss})%360
Segment End: ({ds}%2==1) and {drs} or ({drs}+0.36*{dss})%360
The percentage in the image above is the percentage of the day that has passed
Text: string.format('%.1f', 100*{dtp})
The format function is used to round the percentage to one decimal place (Lua uses C-style formatting). Alternatively, I guess you could have hour and minute rings doing similar to this seconds ring, but that might be a bit dizzying.
Bonus: How to Make a Battery Ring in Facer [Facer]
As we've seen, making a progress ring in WatchMaker Premium is easy with shaders. But, you can actually make something similar to a progress ring in Facer.
The easy way to do this is to use polygons (squares, triangles, hexagons) to cover up sections of a ring, with the polygons coloured the same as the face background. We can then alter the polygon opacities to hide/reveal sections of the ring.
This gives us a progress ring with discrete intervals. How granular it is will depend on how many polygons we're willing to set up. For a battery meter, we could cover up a ring with 100 little squares, but it'd be a pain in the arse to build.
There is also a way to do a continuous progress ring, without too much effort - though it's a bit of an elaborate workaround. First we cover up a ring with 6 triangle, then we can shift, rotate and change the opacities of those triangles to hide/reveal the ring.
Admittedly, this makes the angle on the leading edge of the ring look a bit off in section 6. But we work with what we've got. There are various fiddly little work-arounds that we could use to correct this - e.g. we could cover the leading edge with a little circle or square. Those are left as an exercise for the reader.
The code works like this
Triangle 1:
x: (160+50*cos(rad(3.6*#BLN#))+80*sin(rad(3.6*#BLN#)))
y: (160-80*cos(rad(3.6*#BLN#))+50*sin(rad(3.6*#BLN#)))
Rotation: (30+3.6*#BLN#)
Opacity: $#BLN#<(100/6)?100:0$

Triangle 2:
x: $#BLN#<(100/6)?260:(160+50*cos(rad(3.6*#BLN#))+80*sin(rad(3.6*#BLN#)))$
y: $#BLN#<(100/6)?160:(160-80*cos(rad(3.6*#BLN#))+50*sin(rad(3.6*#BLN#)))$
Rotation: $#BLN#<(100/6)?30:(30+3.6*#BLN#)$
Opacity: $#BLN#<(200/6)?100:0$
And so on for the next 3 triangles (with the boundaries and initial positions suitably adjusted). Finally, for the last triangle, we have
x: 110
y: $#BLN#<(500/6)?80:(80 - 130*(0.06*#BLN# - 5))$
Rotation: 30
Opacity: $#BLN#<100?100:0$
Aside - constructing this made Facer run slooooooow.
So there you have it - it's not easy, but it is possible to make a progress ring in Facer. You could do the same trick in WatchMaker (free) if you didn't want to pay for Premium. But personally, I'd prefer to pay - shaders are easier, and more flexible.
> Other Assorted Nonsense
50 Shades of Grey [Facer] [WM]
This is the sort of dumb thing I think up when I can't get to sleep. To make this, we create a watchface with a white background, and add a black circle/square that fills the whole screen. We then set the circle's opacity to
WM: 2*math.floor(5*{dsps}/6000)

Facer: (2*floor(#DWFSS#/7.2))
This will cycle through 50 different shades of grey - from white to black - over the course of a minute.
Alternatively, we could have it cycle from white to black to white, so that we don't have the sudden jump from black to white at the end of a minute - [download]
For that, the code is
WM: {ds}<=30 and 4*math.floor(5*{dsps}/6000) or (198-4*math.floor(5*{dsps}/6000))
Aside - Facer doesn't seem to allow mathematical expressions in both the then-statement and the else-statement (?!), so we can't adapt the above. Which is annoying.
That Dress [WM]
Colour: 3228de
Saturation: -{dsps}/600
And the text, and the bars at the top and bottom of the screen are
Colour: a07b35
Value: 8*({dsps}/6000)-80
This will go from black-blue to white-gold over the course of a minute. We can get a similar effect by layering a blue circle on top of a white background, and black text on top of a gold copy of the text, then varying the opacity of the black and blue. That method should work in Facer.
Alternatively, we can have the face cycle black-blue to white-gold to black-blue - [download]
Circle:
Saturation: {ds}<=30 and -{dsps}/300 or {dsps}/300-198

Text/bars:
Value: {ds}<=30 and {dsps}/375-80 or 78-{dsps}/375
Racing Numbers [WM]
Racing, in the sense that the numbers are moving from the right side of the screen to the left, all at different speeds (I couldn't think of a better name). Alternatively, you can think of it as the numbers being positioned horizontally based on their current value. It's straightforward enough to construct, I'm sure you can figure it out.
Jitters [Facer]
I don't have a gif of this - so imagine the time in the above image frantically jittering around the centre of the screen. The background is brown because I was tempted to call it 'too much coffee'.
This design is pretty much a case of, I saw that Facer had a 'random' function and I wanted to contrive a use for it. To make this face, we just set the position of the time object to
x: (150+rand(0,20))
y: (170+rand(0,20))
The time will be moved with every frame refresh - in Facer's case, I think that's 60fps. As far as I can tell there's no way to slow it down. I imagine this would get annoying after a while.
Conclusion
If you have a smart watch, making the face a replica of a 'dumb' watch seems a bit like missing the point. Having said that, if I saw a replica of my old watch I'd probably download it.
But the point is, you can do some design things with a smart watch that you could never do with a dumb watch. These are just a few ideas of some cool things you can do with face making apps.
Feel free to download, use, modify, re-post, etc. any of the designs or code in this post. You don't need to ask permission. If you do re-post, a name-check or link back would be nice, but I won't hold you to it.
The folder with all the faces is available here.
If you have any problems, want more details, or just want help with something, feel free to ask in the comments and I'll see what I can do.
Oatzy.
[If I had any sense I'd be trying to make some money off these...]
Subscribe to:
Posts (Atom)